How to Create a “Leave Type”? #
For a visual walkthrough, watch our tutorial video below.
Creating a “Leave Type” #
Creating a Leave Type in OfficePortal is a seamless process that involves three essential stages:
• Basic Settings,
• Availability Settings, and
• Advanced Settings.
Follow the steps outlined below to configure leave types to suit your organization’s needs.
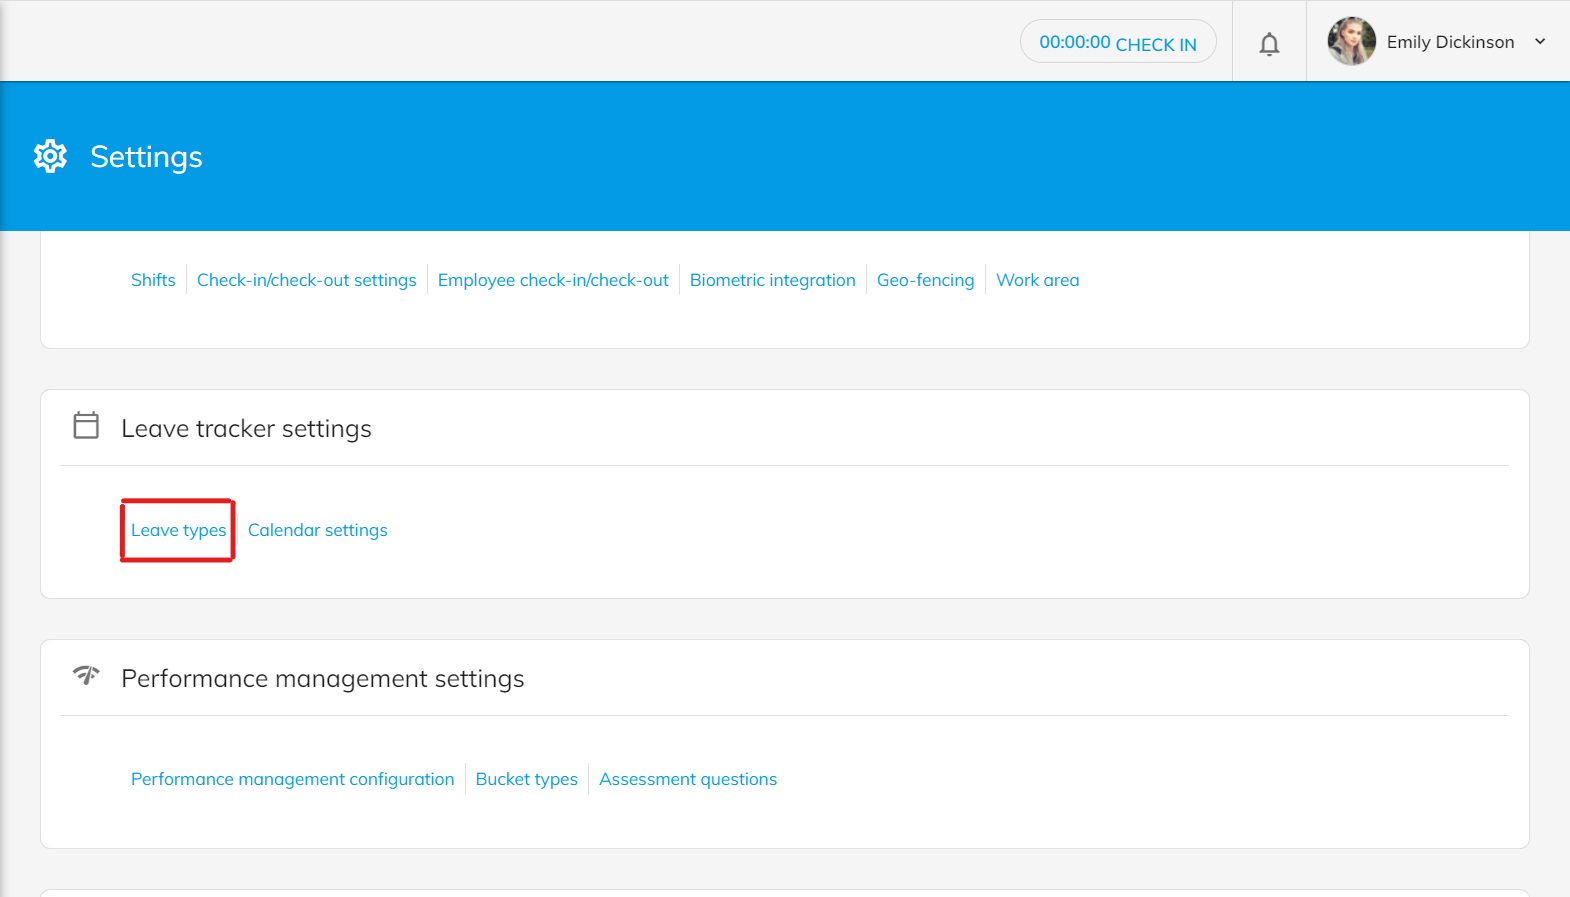
Accessing ‘Leave Type’ #
Once logged in, locate and click on “Settings” in Black Panel. This will navigate you to the Global settings of OfficePortal.

Scroll down the page to find the Leave Tracker settings. In Leave Tracker settings, you’ll see an option called “Leave Types”. This is where you can view and manage different types of leaves.
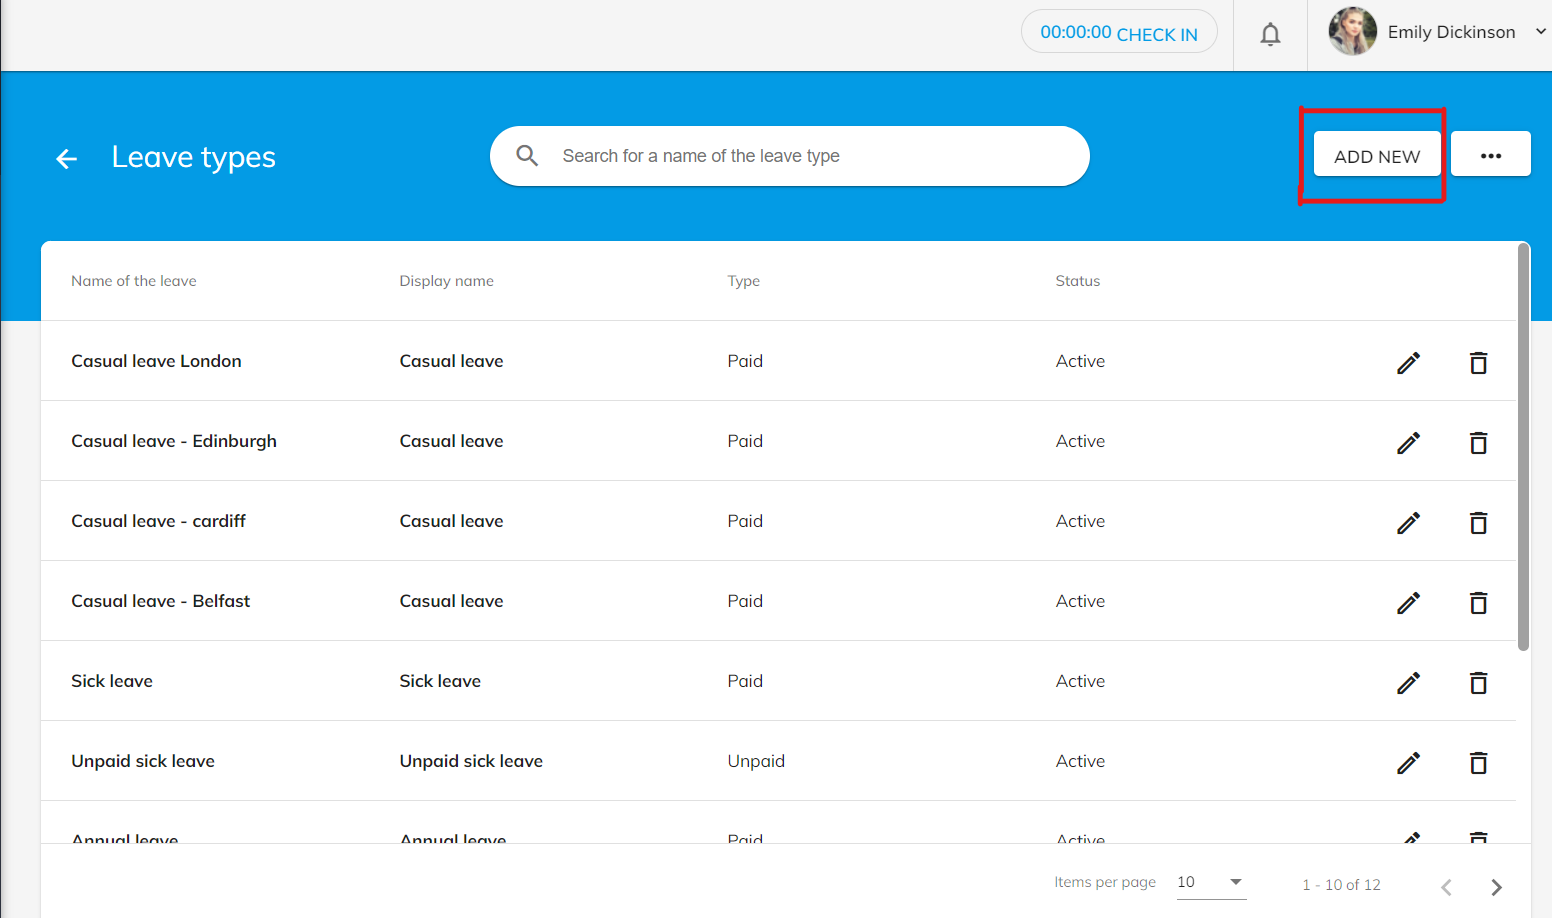
Crafting and Configuring New Leave Types #
Click the “Add New” option at the right corner of the page. This will take you to the page where you can start creating a new leave type.
Basic Settings: #

In this section, you’ll define the fundamental parameters for each leave type.
• Name and Display Name (Mandatory): Set as “Earned Leave” for this example.
• Short Code: Assign a short reference code for easy identification, such as “EL” for Earned Leave.
• Color Coding: Choose a color to represent this leave type in the attendance tracker. For instance, selecting green will display a green square labeled “EL” when an employee avails of this leave.
• Paid or UnPaid:

Specify whether the leave type is paid or unpaid. This ensures clarity for employees and payroll regarding compensation for these leaves.
• Duration: Determine if the leave should be counted in days or hours.
• Description (Optional): Add any relevant notes or particulars for future reference.
• Valid From: Set the date when the accrual of this leave type begins. Depending on your organization’s calendar, choose either the start of the calendar year (e.g., 1st of January) or the financial year (e.g., 1st of April).
• Accrual Frequency: Define how often leaves accrue, whether annually, half-yearly, quarterly, or monthly based on cycle or based on no. of working days.
• Accrual Dates: Specify the specific dates when accruals occur (e.g., 1st of January, April, July, and October).
• Applicability: Decide if the leave type applies universally or based on tenure. For instance, you might offer enhanced leave benefits after a certain number of years of service.
• Prorate Approval: Useful for employees joining mid-year. It adjusts accrual based on their joining date.
• Carry Forward: Define how many unused days can be carried over to the next year. For example, if set to 5 days and an employee has 10 unused days, only 5 will roll over.
• Carry Forward Expiry: Set a time frame for using carried-over leaves (e.g., 90 days). After this period, they will expire. OfficePortal manages this seamlessly, eliminating the need for manual tracking.
• Leave Encashment: Enable employees to monetize unused leaves. Decide whether this will be based on full salary or just the basic.
• Maximum Encashable Days: Define the maximum number of days employees can encash.
Remember to click the save button to secure all configurations.
Having covered the basics, let’s move on to “Availability Settings.”
Leave Accrual by Working Days : #

Previously, leave accrual was based solely on the cycle option. Now, we’ve introduced a new feature called “By Working Days.” This option allows you to reward dedicated employees who maintain consistent attendance. For instance, you can add an extra day of leave balance for employees who come to work regularly without taking any leave. With this feature, you can automatically grant additional leave balance when specific conditions are met.
Number of working days to accrue leave #
Accrual period #
The accrual period determines when the leave will be credited. You can choose from options such as “within a month,” “within a quarter,” “within half a year,” or “within a year.” Select the period that aligns best with your organization’s policies.
Accrual at #
Next, you can set the Accrual at Duration. The available options are:
- As soon as the condition is met
- End of the accrual period
- Within a specific number of days
If you select the “Within a specific number of days” option, you’ll be prompted to enter the number of days in a separate field. Choose the option that suits your organization’s leave policies.
Number of days #
Here, you can specify the number of leave days to be added to the balance. This can be one day or more, depending on your organization’s policies.

In the example image, if employees work regularly for 20 working days, 1 leave count will be accrued on the 11th day after completing the 20 working days. Currently, the “All Employees” option is selected, making this rule applicable to all employees. However, you can customize it by selecting the “Based on Experience” option and defining the service period details according to your company’s policies.

Availability Settings: #
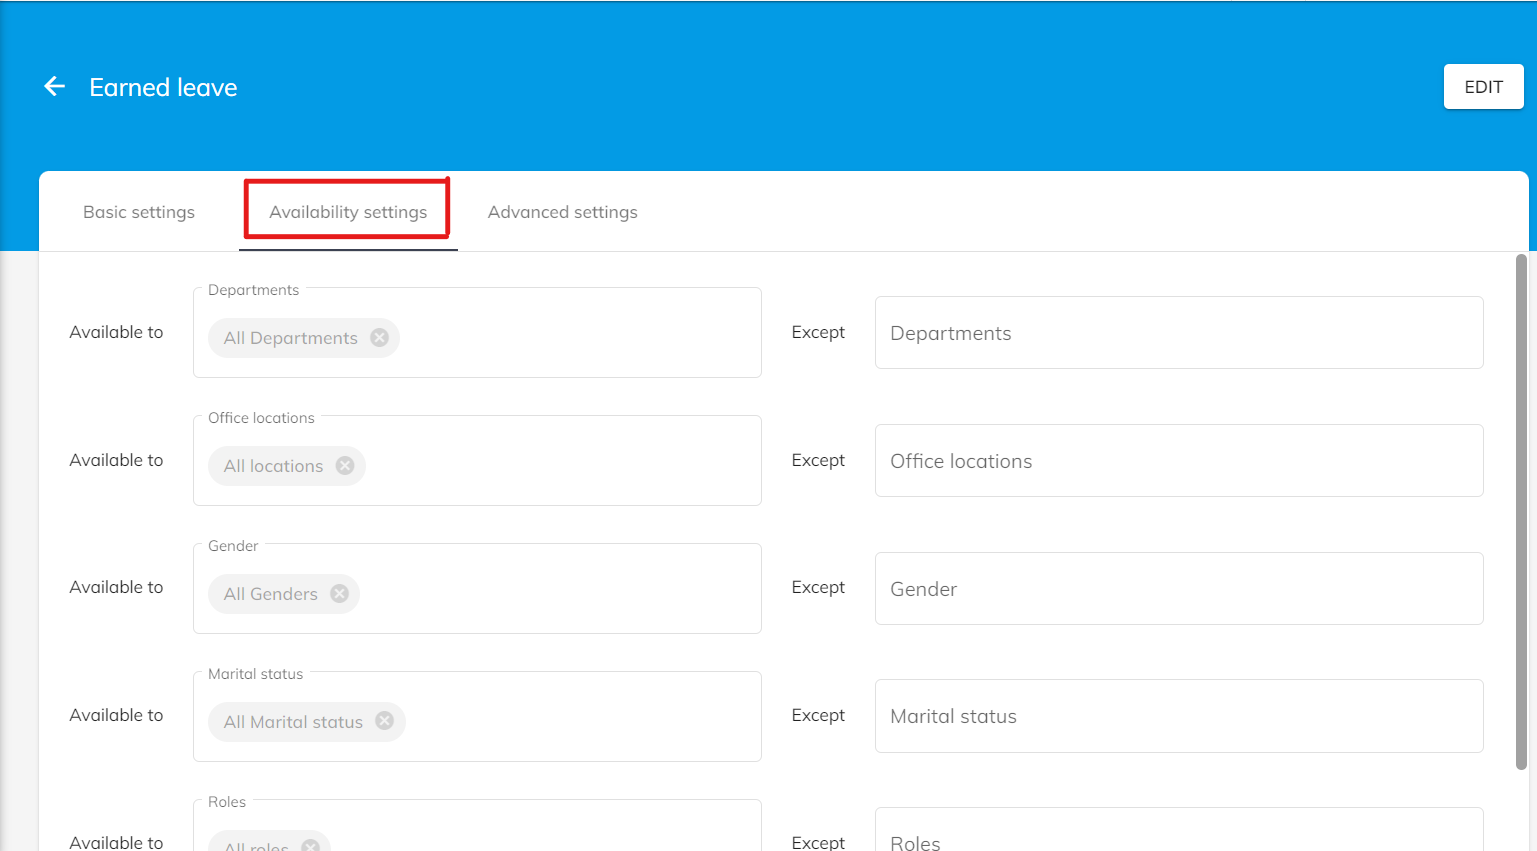
In this section, you’ll define the applicability of the leave type.
• When creating a leave type, consider it as a blanket rule that covers everyone by default, regardless of job, location, gender, marital status, or position in the company.
• However, there might be exceptions. For example, Maternity Leave won’t apply to male employees. Here, you’d select “except male.”
Once you’ve made your choices, save them and proceed to a more detailed setup in the Advanced Settings.
Advanced Settings: #
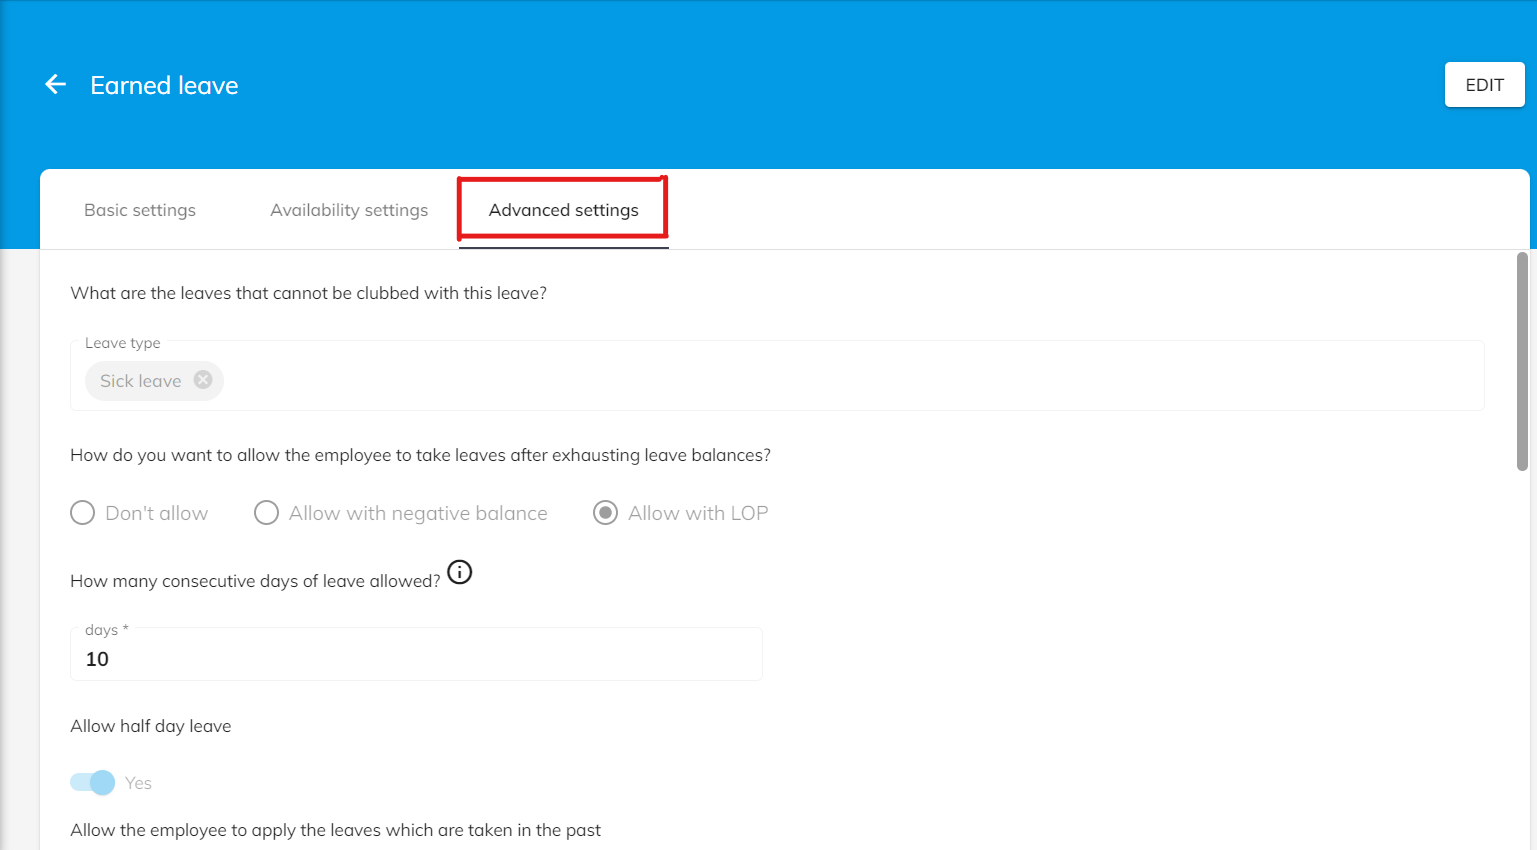
This is where the magic happens, and you get to customize exactly how this leave type behaves. Just answer the following questions.
Leave Types that Cannot be Clubbed with this Leave Type:
Think of this as preventing the mixing of two or any other types of leaves. For example, if someone took a sick leave yesterday, and you don’t want them taking a different kind of leave immediately after, you can prevent it here.
Allowance after Quota is Finished:
• Do not allow: Employees can’t take any more leaves once their quota is finished.
• Allow with negative balance: They can take a leave, but they will owe that leave time later on.
• Allow with loss of pay: They can take the leave, but they won’t be paid for that day.
How many consecutive days of leave are Allowed?
This sets a limit. For example, if you choose 5, an employee can’t take more than 5 continuous days off using this leave type.
Allow Half Day Leave:
It’s about flexibility. Do you want to allow someone to take just the morning or afternoon off for flexibility.
Allow the employee to apply for leaves they took in the past?
Sometimes employees might forget to apply for a leave they took a week ago. This setting decides if they’re allowed to do that and for how long after the actual leave they can apply.
Do you want holidays to count as leaves if they’re in the middle of an employee’s leave period?
Let’s say an employee takes leave from Monday to Wednesday, and Tuesday is a public holiday. Should Tuesday count as a leave? Decide here.
How many days in advance should the leave be applied for?
This ensures you get enough notice before an employee takes a leave. If you want a 7-day notice, set that here.
Should a reason be required when applying for leave?
Giving “Yes” to this question will make the reason field a mandatory one for the particular leave type.
Do employees need to show any proof or reason for their leave?
This asks if you need any documentation for the leave, like a doctor’s note for sickness, and when it’s necessary.
Can employees about to leave the company still take this leave?
If someone is about to exit the company, this setting decides if they can still use this type of leave.
How to Save the Configured Settings #
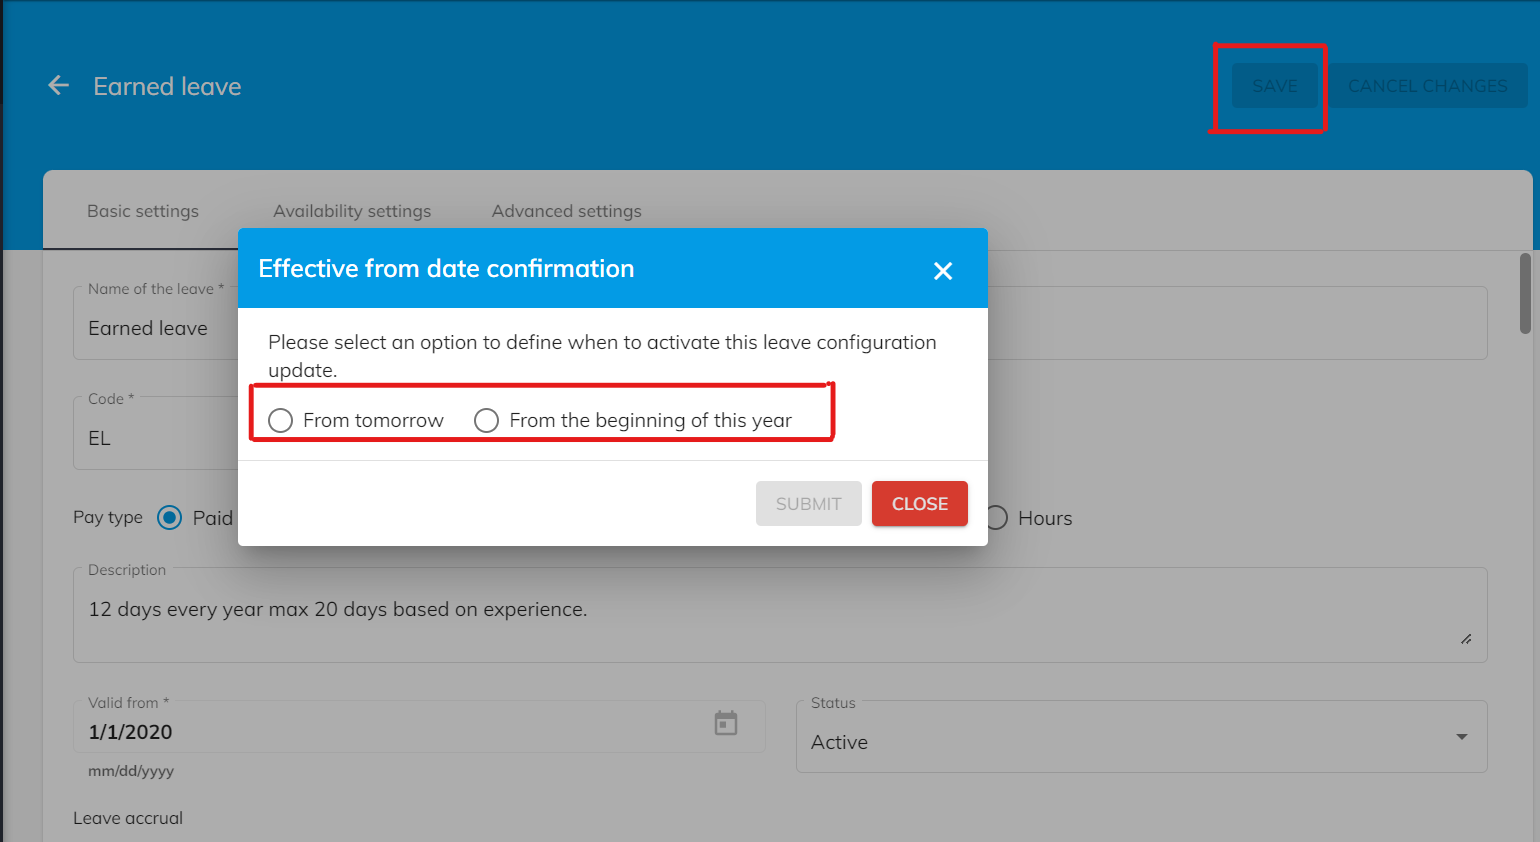
Once you’ve tailored these settings to your company’s needs, make sure you save it. Once you hit on the save button it asks for this setting to activate from tomorrow onwards or from the beginning of the year.
“OfficePortal” then ensures these rules are applied to everyone. If you have further questions or need any help, always remember to reach out to OfficePortal’s support.


