A project is a set of tasks that must be performed to achieve a specific goal. A project is work that we do for a client or on behalf of the client. Associating a client with the project helps in tracking the project operations.
Under Projects, you can update the projects you are doing or have done for your clients.
Navigate to the Time Tracker > Projects feature in OfficePortal.
Click on the Add New button. As soon as you click on the Add New button, you can view a form to add the project details.
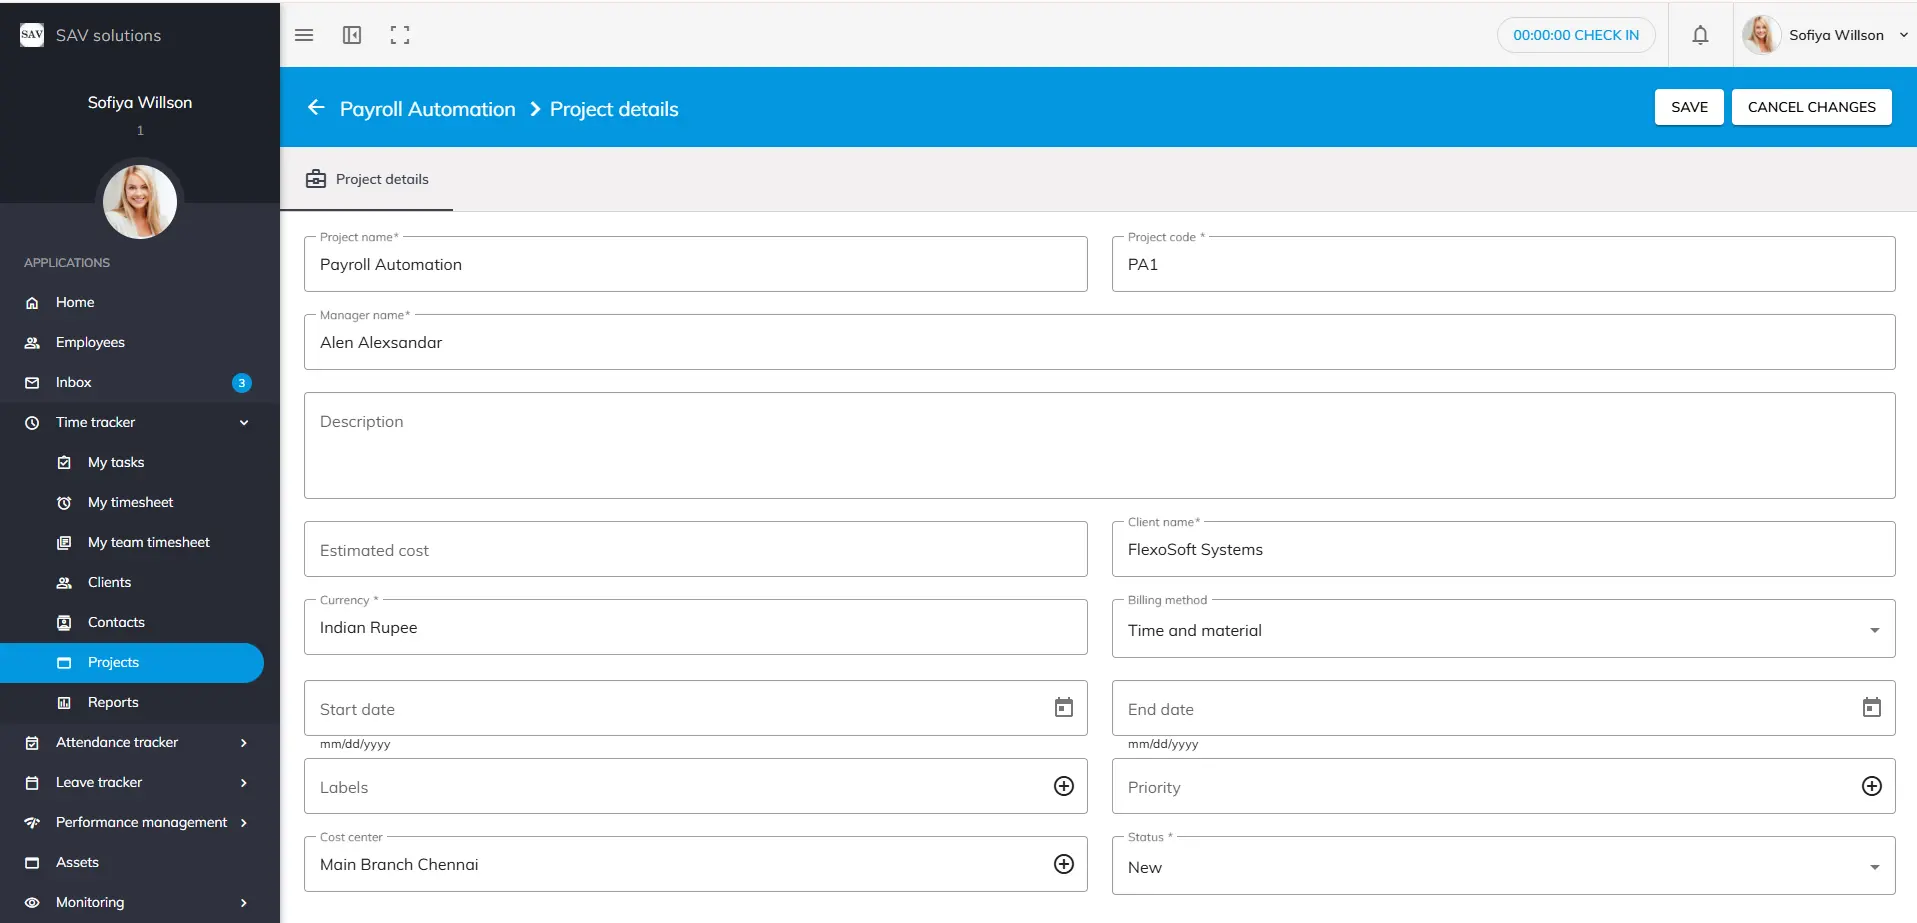
Step 1: First, write the project name. For example, here I have given the project name as “Payroll Automation”.
Step 2: Then provide a project code as per your organisational settings. Here, I have given it as PA 1.
Step 3: Select the manager’s name from the drop-down list, and provide a description for your project if needed.
Step 4: Provide the estimated cost for your project if needed.
Step 5: Add your client’s name from the drop-down list.
Please note: In case the appropriate client name is not available in the drop-down list, go to the Client section and add the client details by clicking the Add New button.
Please note: Projects and clients can be added only by those who have the appropriate role access.
Step 6: Select the currency. For example, here I am selecting “Indian Rupees”.
Step 7: Select the billing type.
Step 8: Add the start and end dates of the project.
Step 9: Add labels if needed.
Step 10: Set the priority of the task. Select from High, Medium, or Low.
Step 11: Add a cost centre if required. A cost centre is one of the branches of an organisation from which all financial operations are handled. Here I have created it as “Main Branch, Chennai” — you can set this as per your organisational needs.
Please note: A newly added project will be set to New status by default.
Step 12: Now, click the Save button to save the project.
Once you have saved the project, you can also edit the project details later using the Edit option.
Please note: Once you have clicked the Save button, the Project Contributors, Boards, and Public Board details will be displayed.
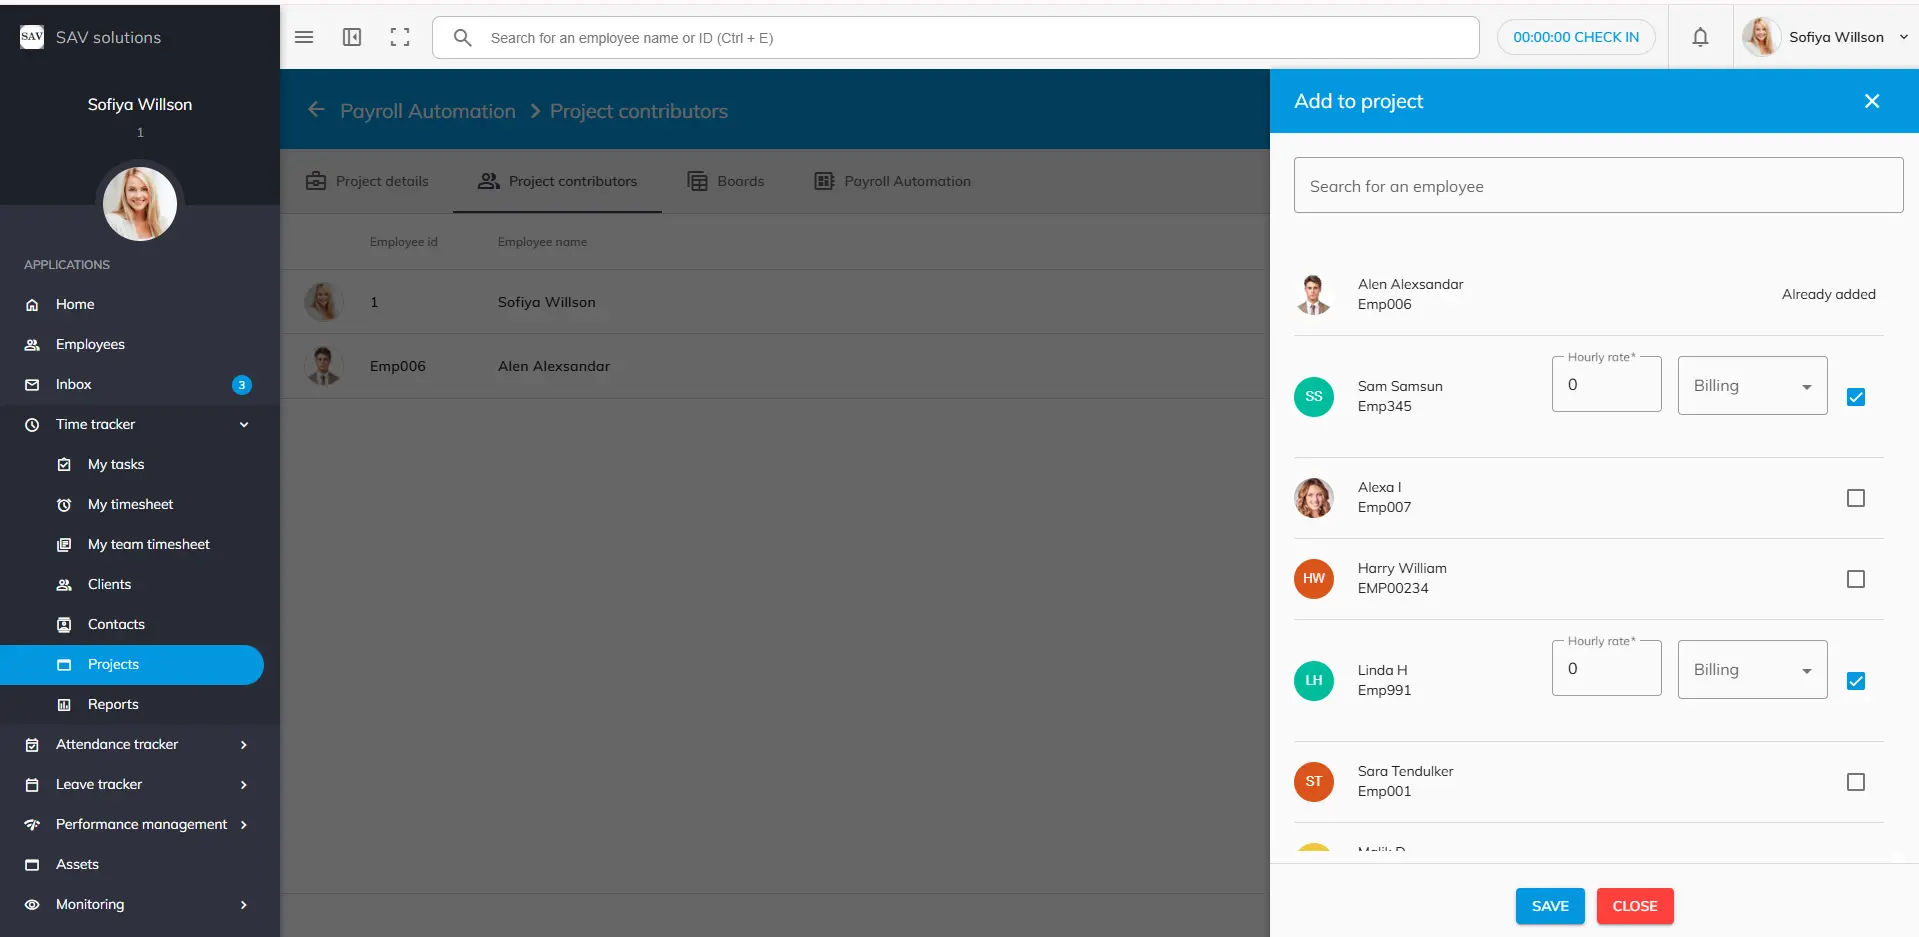
The project contributor is an employee who contributes to a project by doing activities and fulfilling project team obligations. Contributors make a major contribution to the project’s improvement by making valuable suggestions.
How to add contributors to the project?
Just tap on the “Project contributors” tab.
Click on the “Add Contributor” button to add the employees working on the project.
Once you click on the “Add Contributor” button, the “Add to project” dialog box appears where you can choose the employees.
You can select multiple employees or search for the employees you would like to add to the project.
Once you select the employees, it is mandatory to add their hourly rate.
Finally, click on the Save button to save the Project Contributors.
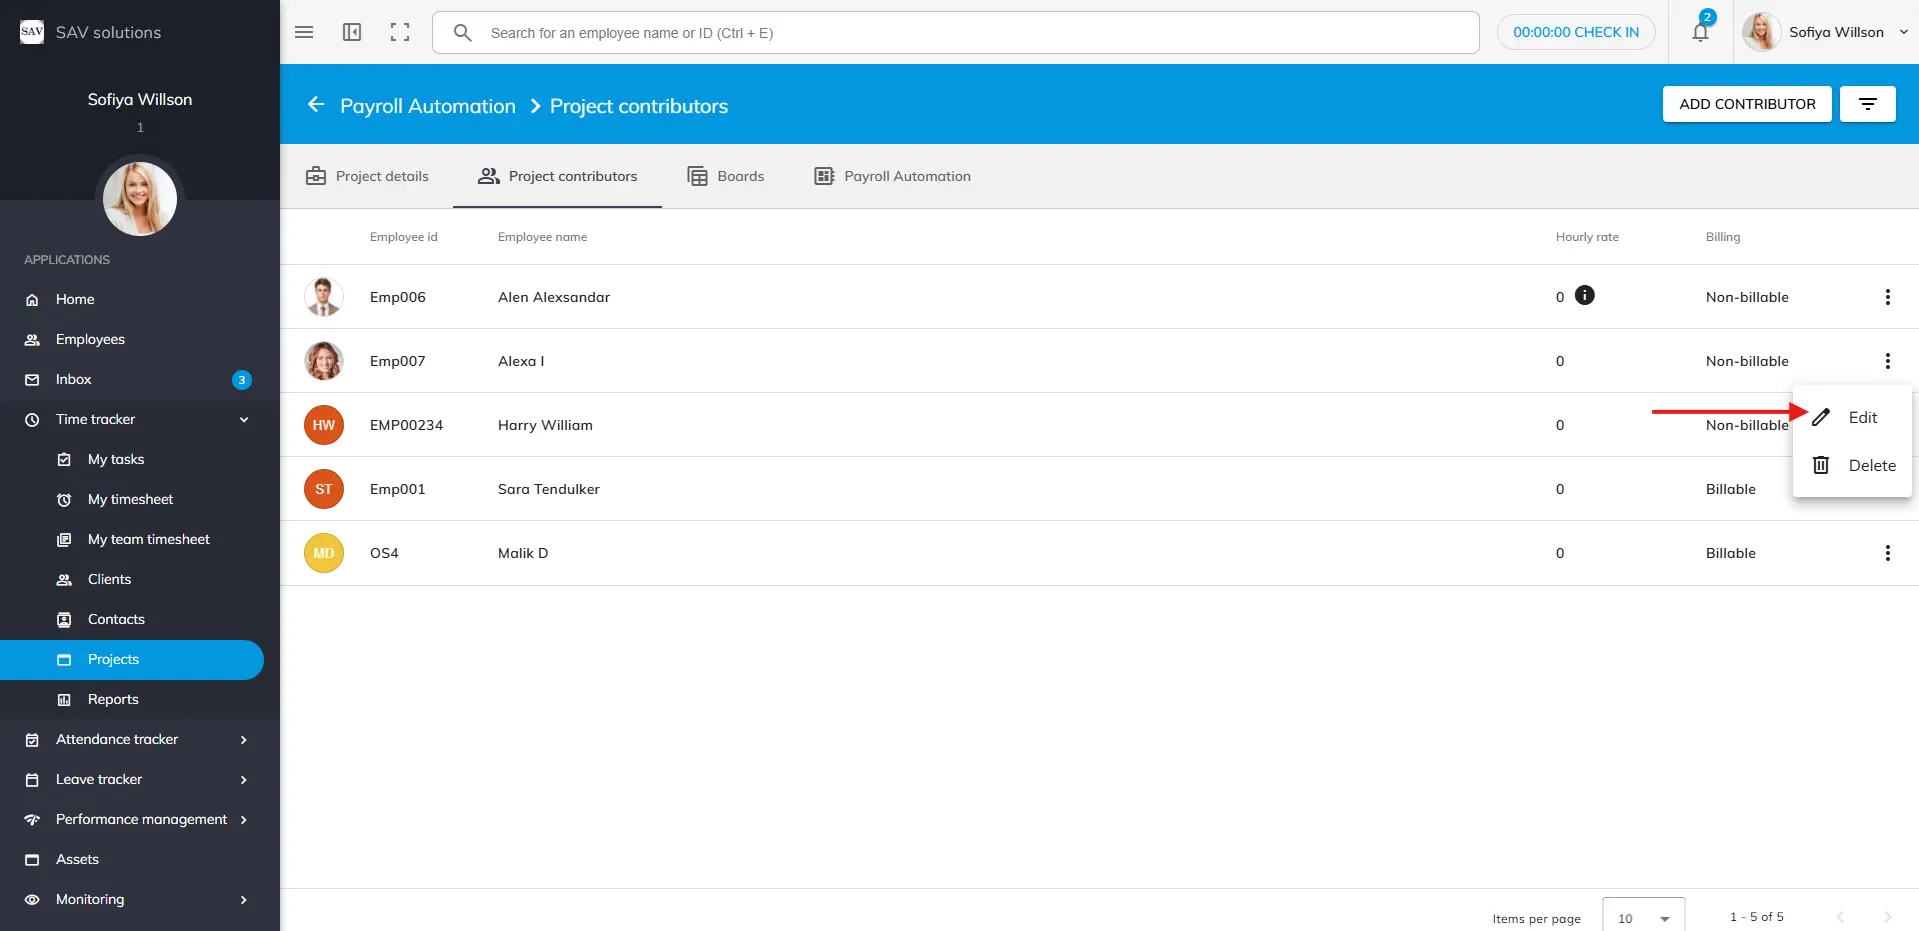
How to update the hourly rate for the employees?
You can follow the below steps to update the hourly rate of the employees.
Click on the three dots of the employee for whom you would like to update the hourly rate.
Click on the “Edit button”, the “update hourly rate” dialog box will appear.
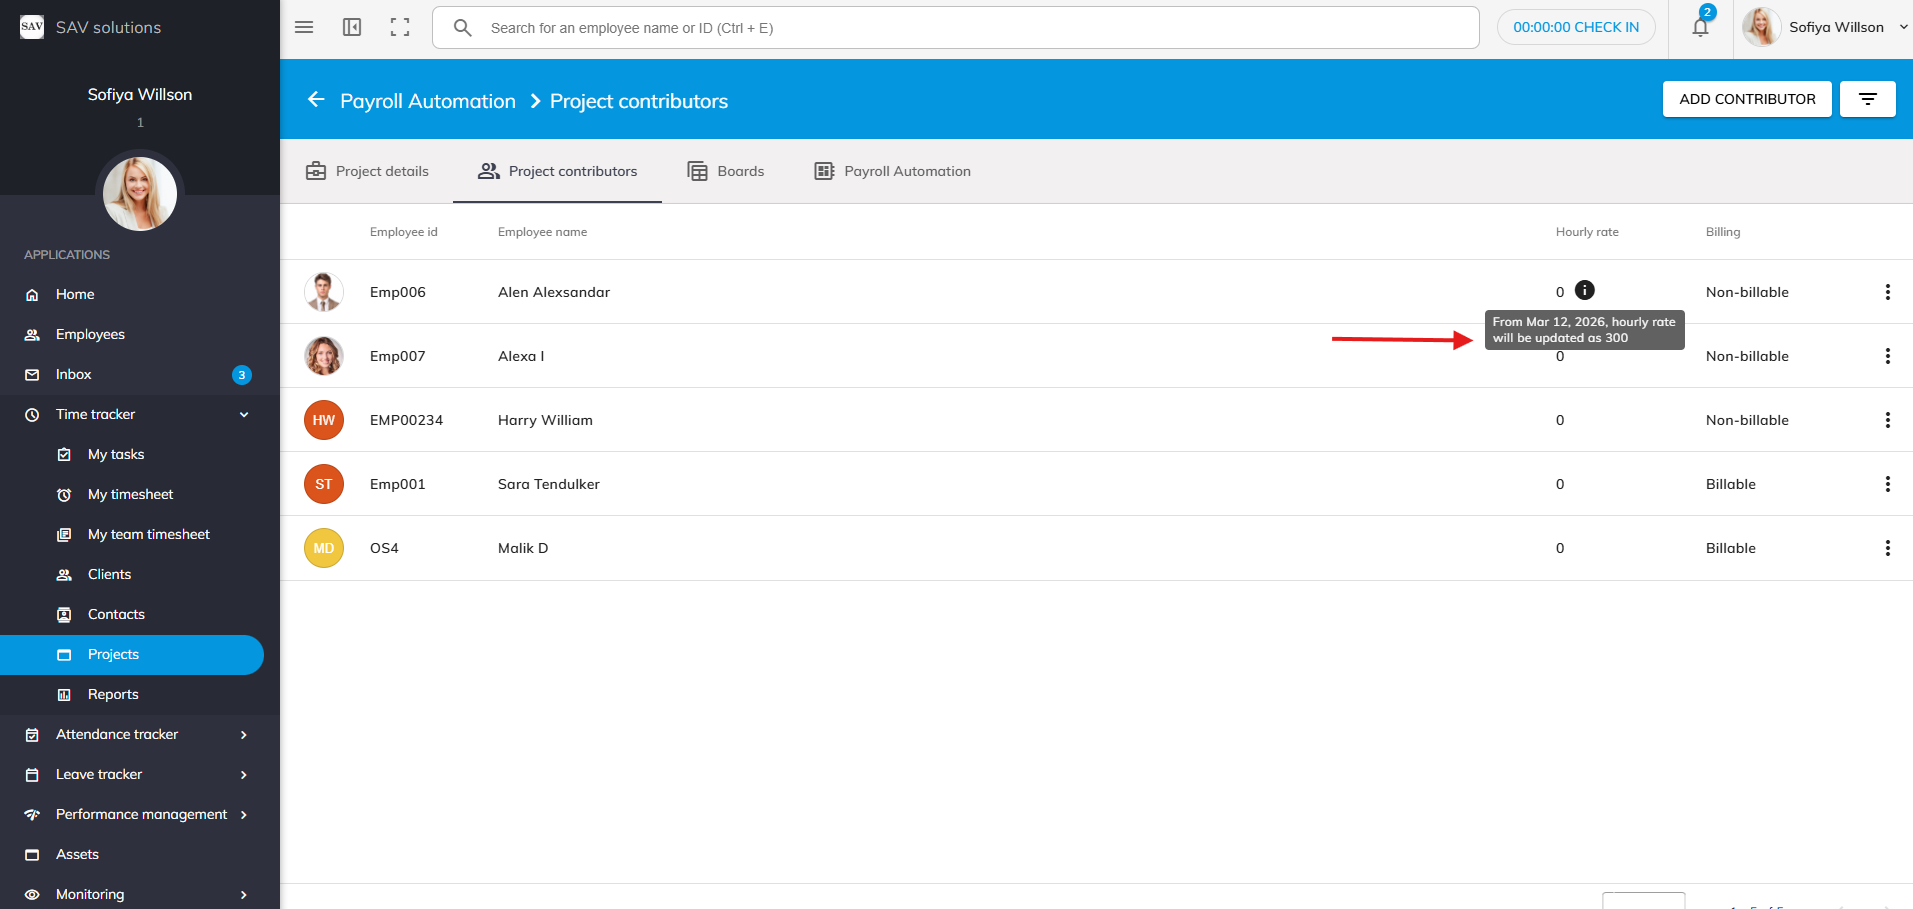
Enter the revised “hourly rate” of the employee.
Provide the date when the revised “hourly rate” shall be applicable.
Click on the “Save button” to save the revised hourly rate.
Please note: You can revise the hourly rate only for future date. In case, if you have revised the hourly rate for any project contributor, an “i” icon will appear and if you click on it, you will get the information about what is the newly revised hourly rate and it’s effective from date for that particular contributor.
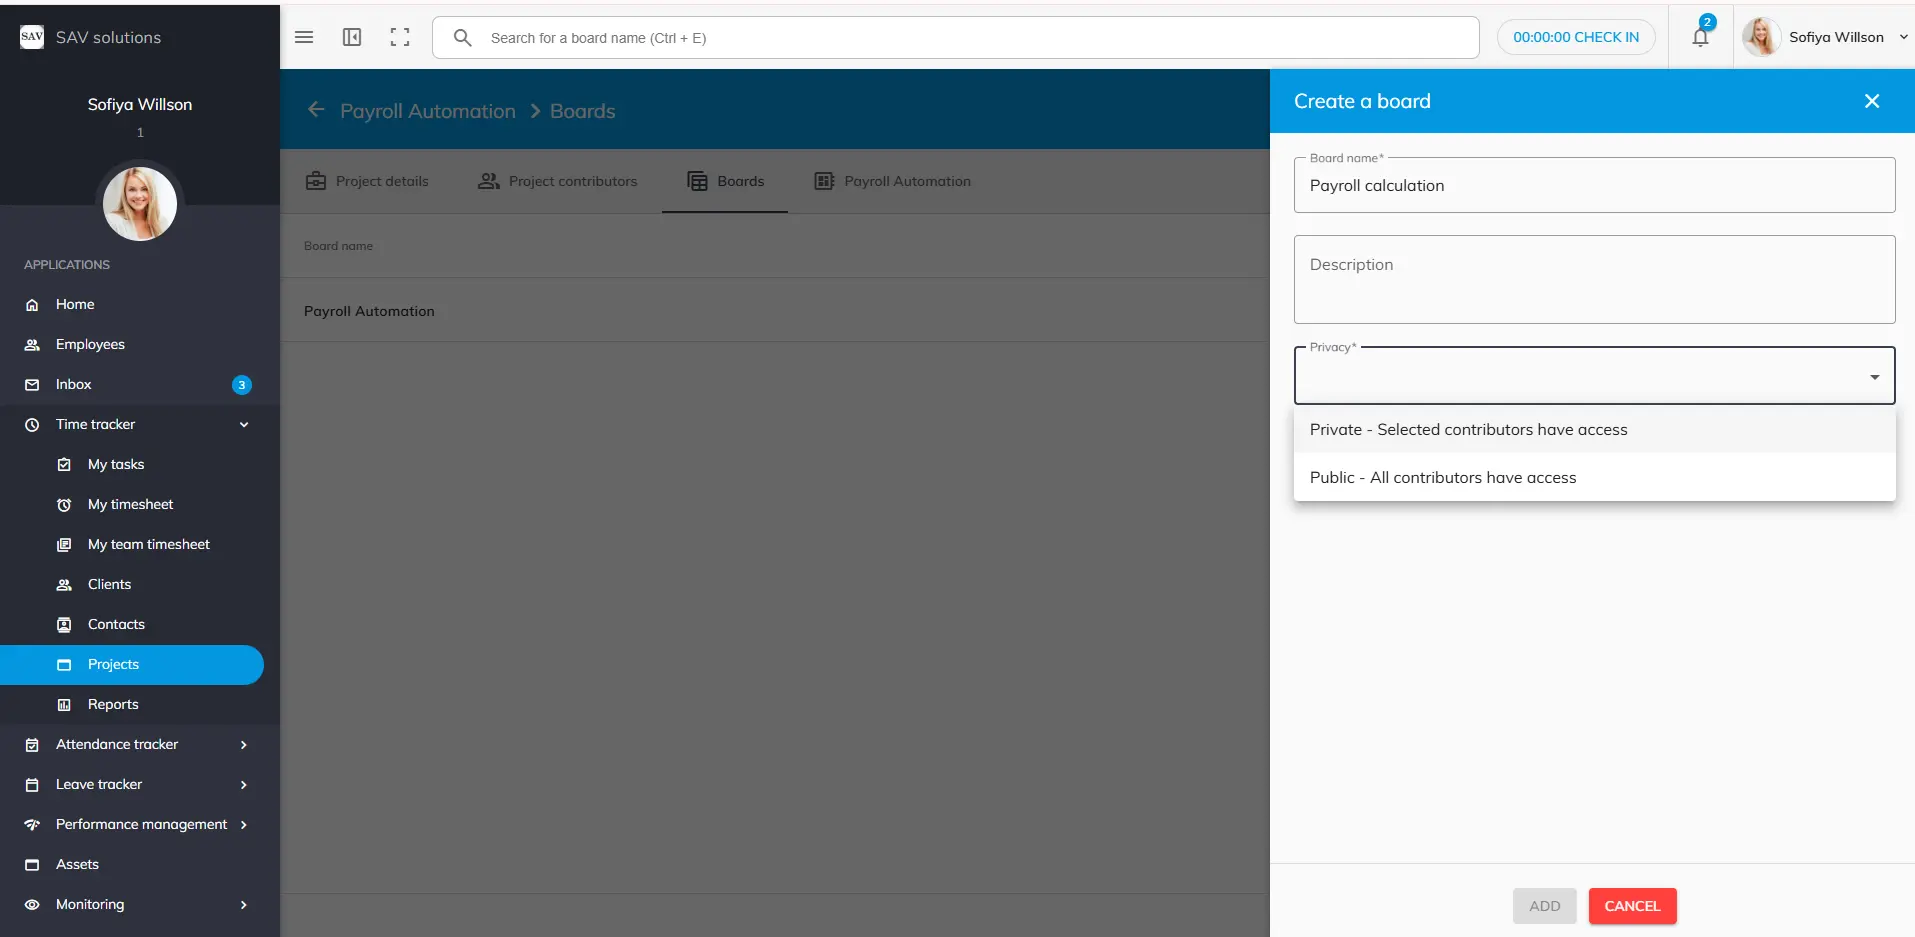
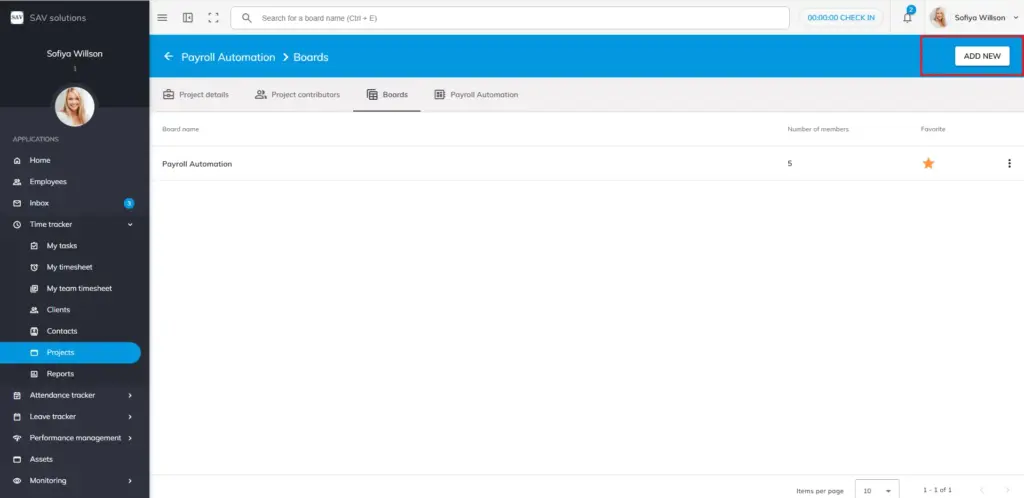
Boards help you organize tasks within a project. Each project comes with a default public board, and you can create additional boards with custom access settings to suit your team’s workflow.
When you create a new project, a default public board is automatically generated with your project name. This board is accessible to all project contributors and serves as your starting point.
Step1: Navigate to your project and click Add New. Step 2: Enter a Board Name. Step 3: Optionally, enter a Description to clarify the board’s purpose. Step 4: Select the Board Privacy setting — either Public or Private. Step 5: Click next and add Board Contributors from your project’s contributor list. Then press “create” to create a board.
Note: Board contributors can only be selected from the existing contributors of the project the board belongs to.
A task is a set of activities that must be completed within a certain amount of time and contribute to achieving work-related goals. It’s a vital step to completing the project. Based on the level of detail you desire, you can determine the size and quantity of tasks in a project. Breaking down tasks into smaller or manageable chunks will help you manage project risks, costs, quality, time, and other factors to enable everyone involved to complete the project on schedule and budget.
How to add tasks for each project in OfficePortal?
Click on the “Add Task” button.
The “Add task” dialog box appears once you click on the “Add task” button.
You can enter the task name.
It is mandatory to set the task status as “Active” so that the contributors can submit the timesheet.
Finally, click on the Save button to save the task details.
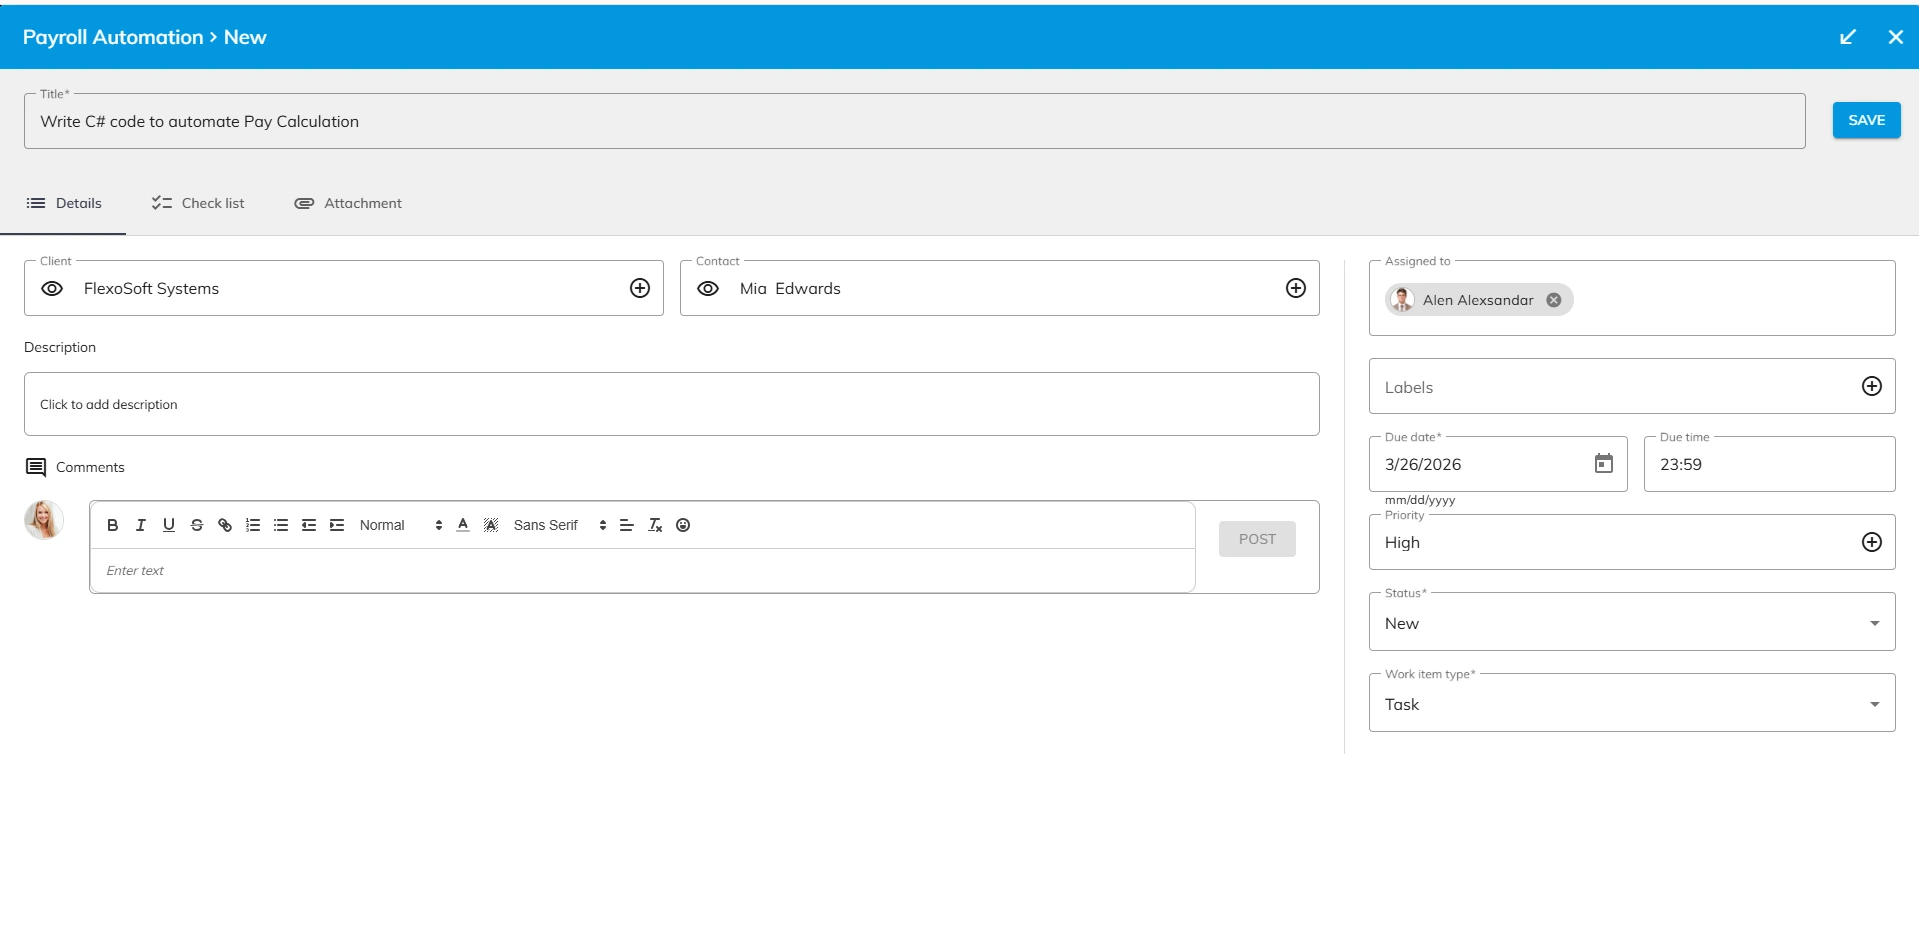
To add a new task in OfficePortal, first, click the “Add New” button and then select the task type. Next, write the task title and add a task description. You can attach supporting documents by clicking the attachment button, and assign task members from the project contributors list. Optionally, you can add a label, set task priority, and add a due date. The task’s default status is set to “New,” but you can select the task status and choose the work item type. Once all details are filled in, click Save to save the task. You can track all task activities in the activity area and view or add timesheet entries in the timesheet section. You can also chat with task members using @mentions for quick communication and react to replies by clicking the like button.
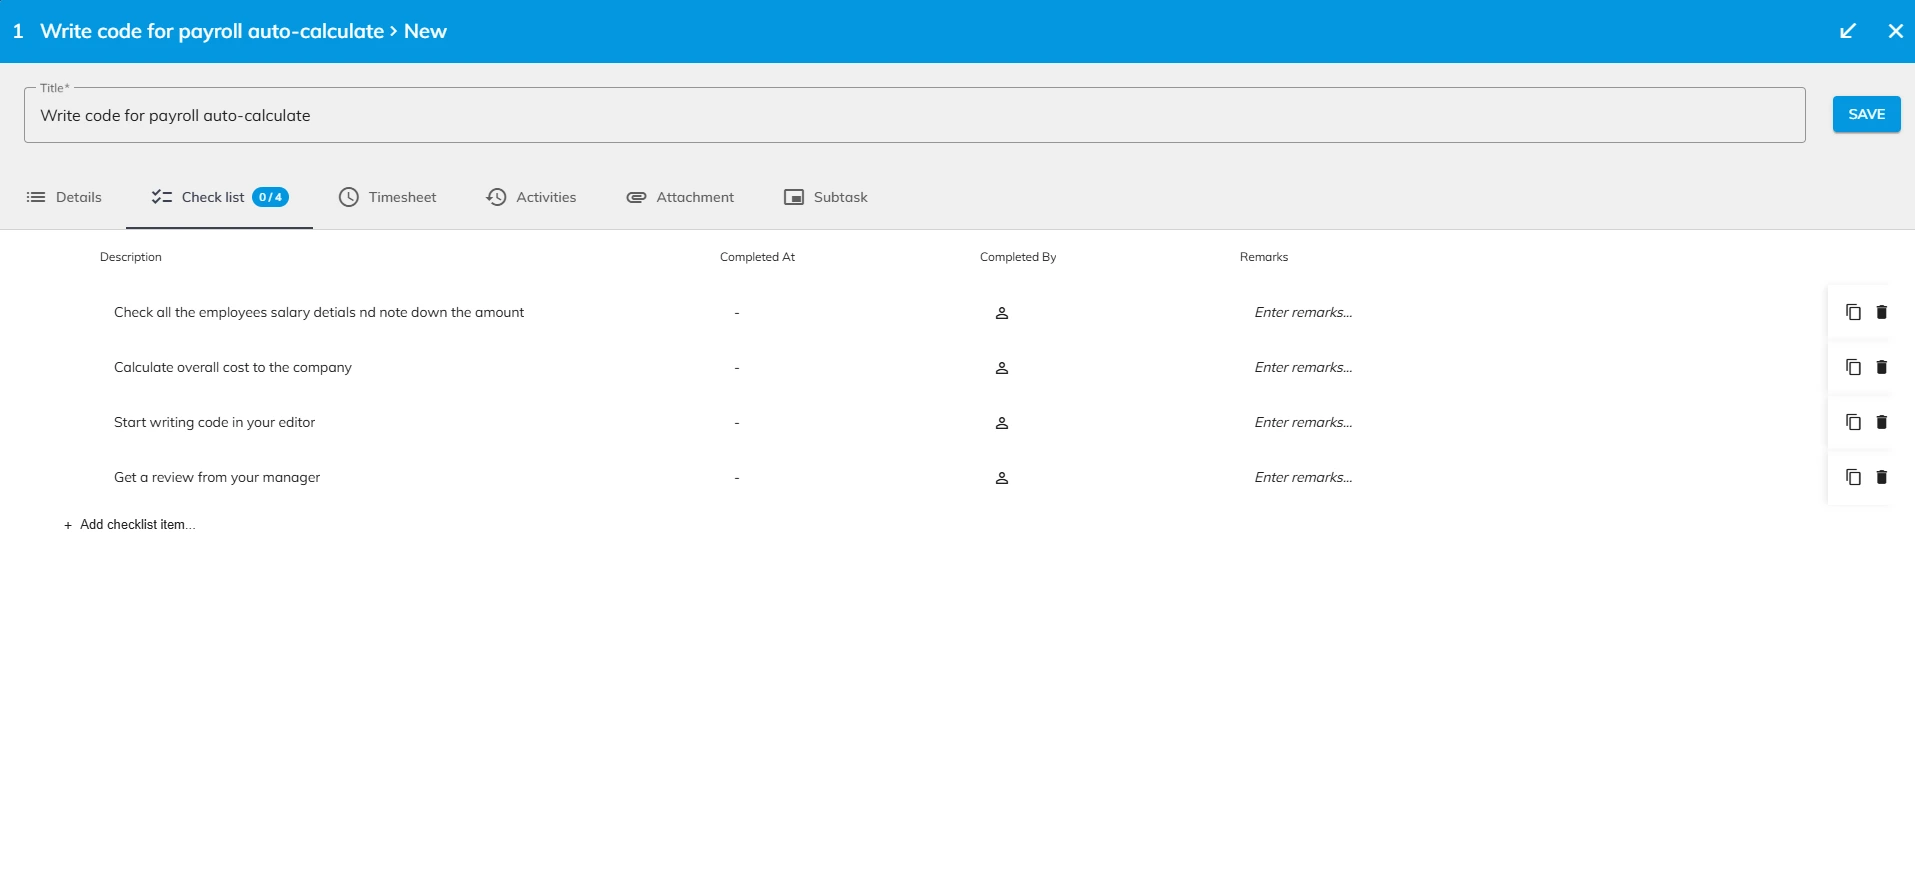
The Checklist feature ensures every step of a task is completed without anything being missed. You can add multiple checklist items to a single task, track progress, and maintain accountability through automatic field population.
Once a task with a checklist is saved, a progress indicator displays how many checklist items have been completed out of the total — for example, 2 of 5 completed. This gives you a quick overview of how far along a task is without opening each item individually.
Task Completion: A task cannot be moved from New or In Progress status to Done until all checklist items under that task have been completed.
Project Completion: A project cannot be moved from New or In Progress status to Done until all tasks within the project have been moved to Done status.
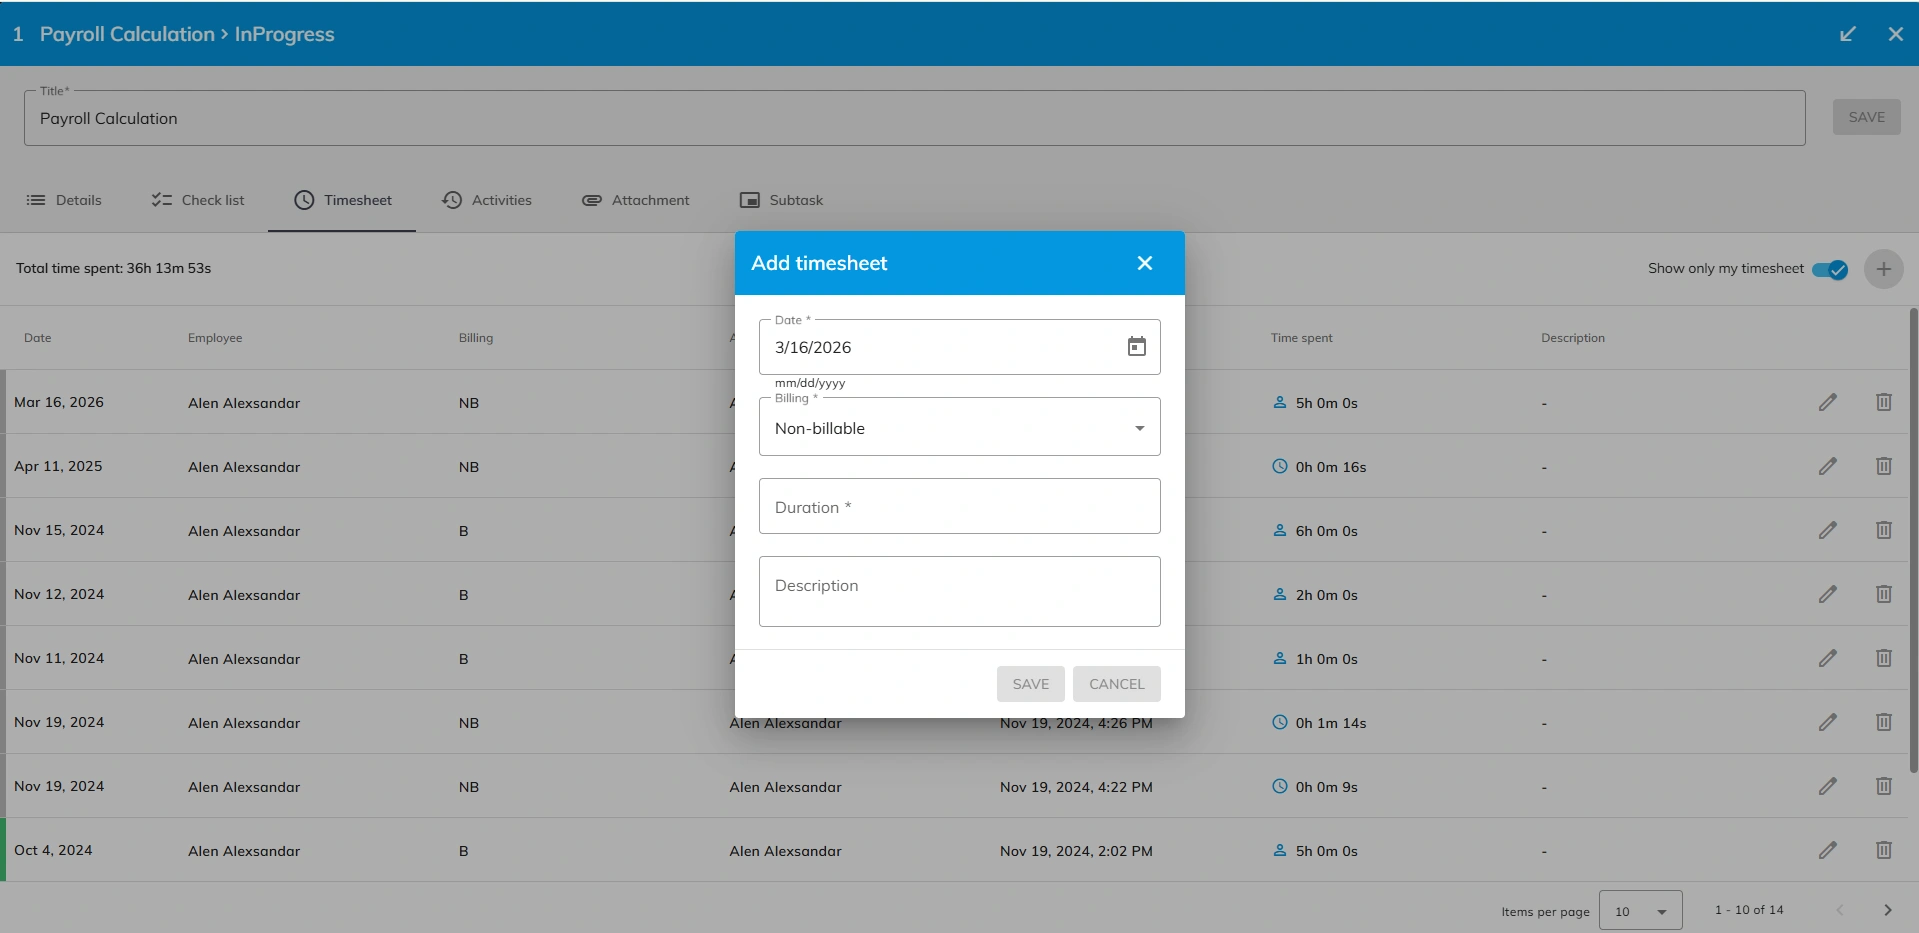
Inside tasks, you can directly fill the timesheet. To do that,
Step 1: Click the Timesheet option available next to the Checklist option within a task.
Step 2: Click the plus icon in the top right.
Step 3: You will see a pop-up box with Date, Billing types, Duration and description to be filled.
Note: While opening a timesheet from inside a task, always it displays the current date. You can later modify the date as a past date later. You cannot add future date.
Step 4: After filling all the necessary details, you can click “Save” to save the timesheet entry.
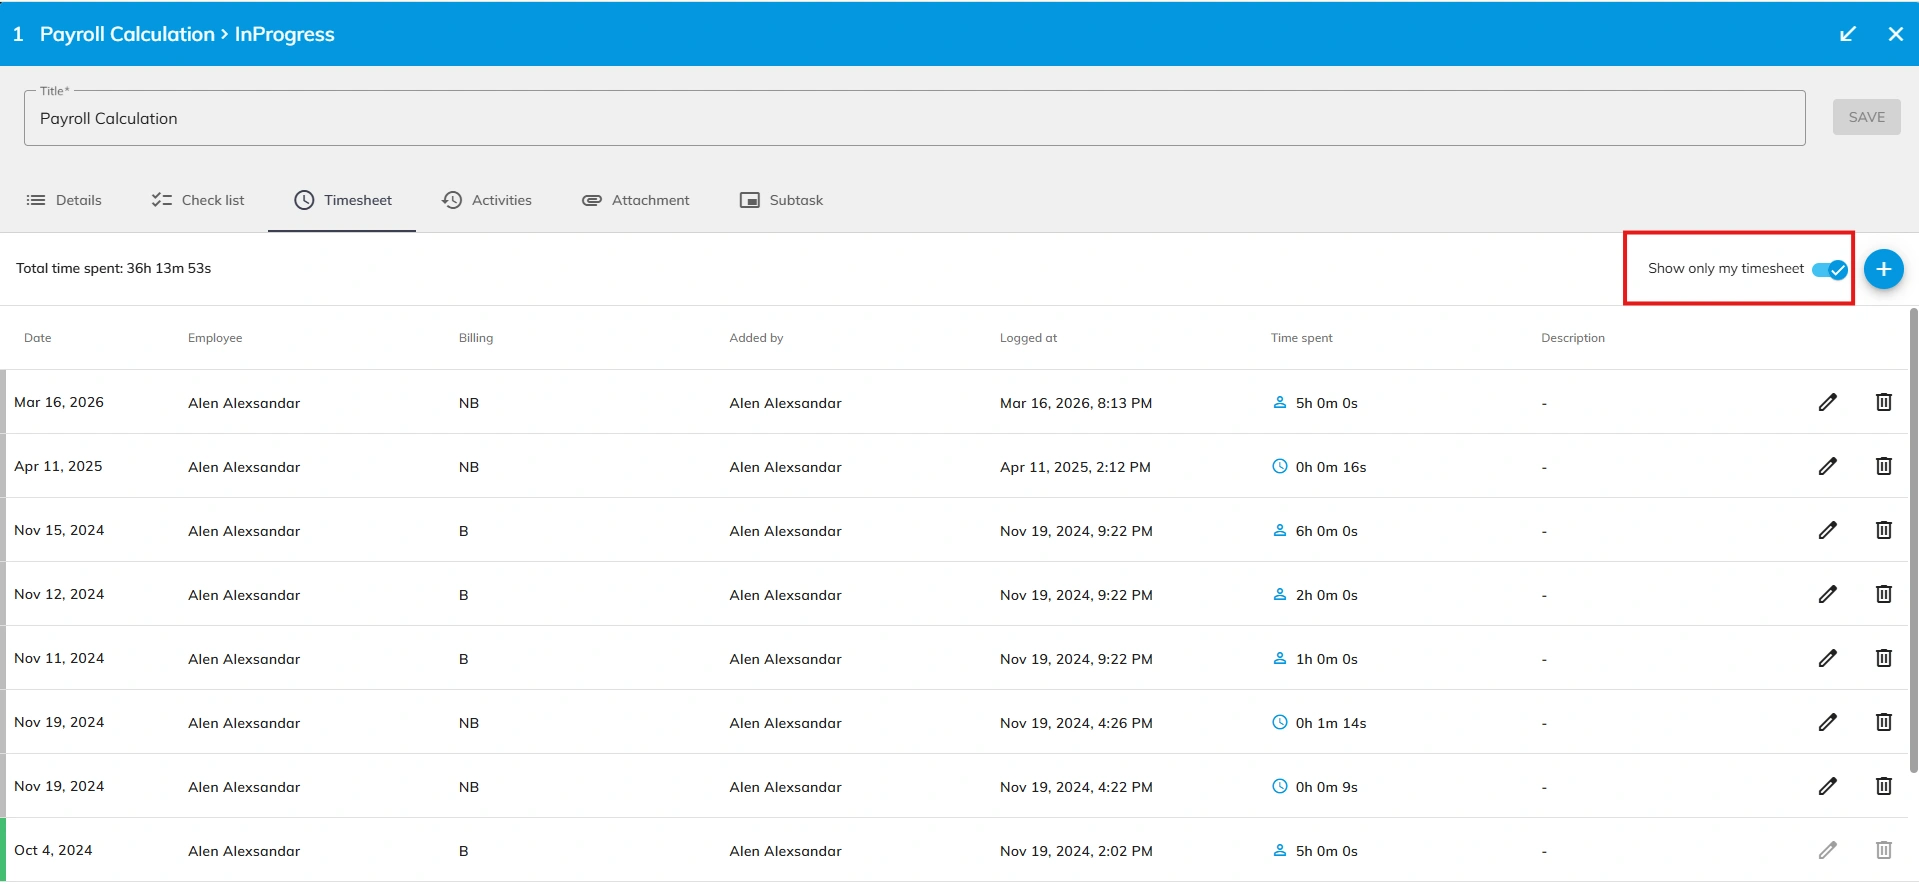
You cannot directly submit your timesheet from here. For that, you must go to “My timesheet” section. Here you can fill your timesheet entry only.
Please note: Here you can also see the timesheet entries other task members by disabling, “Show only my timesheet” toggle.
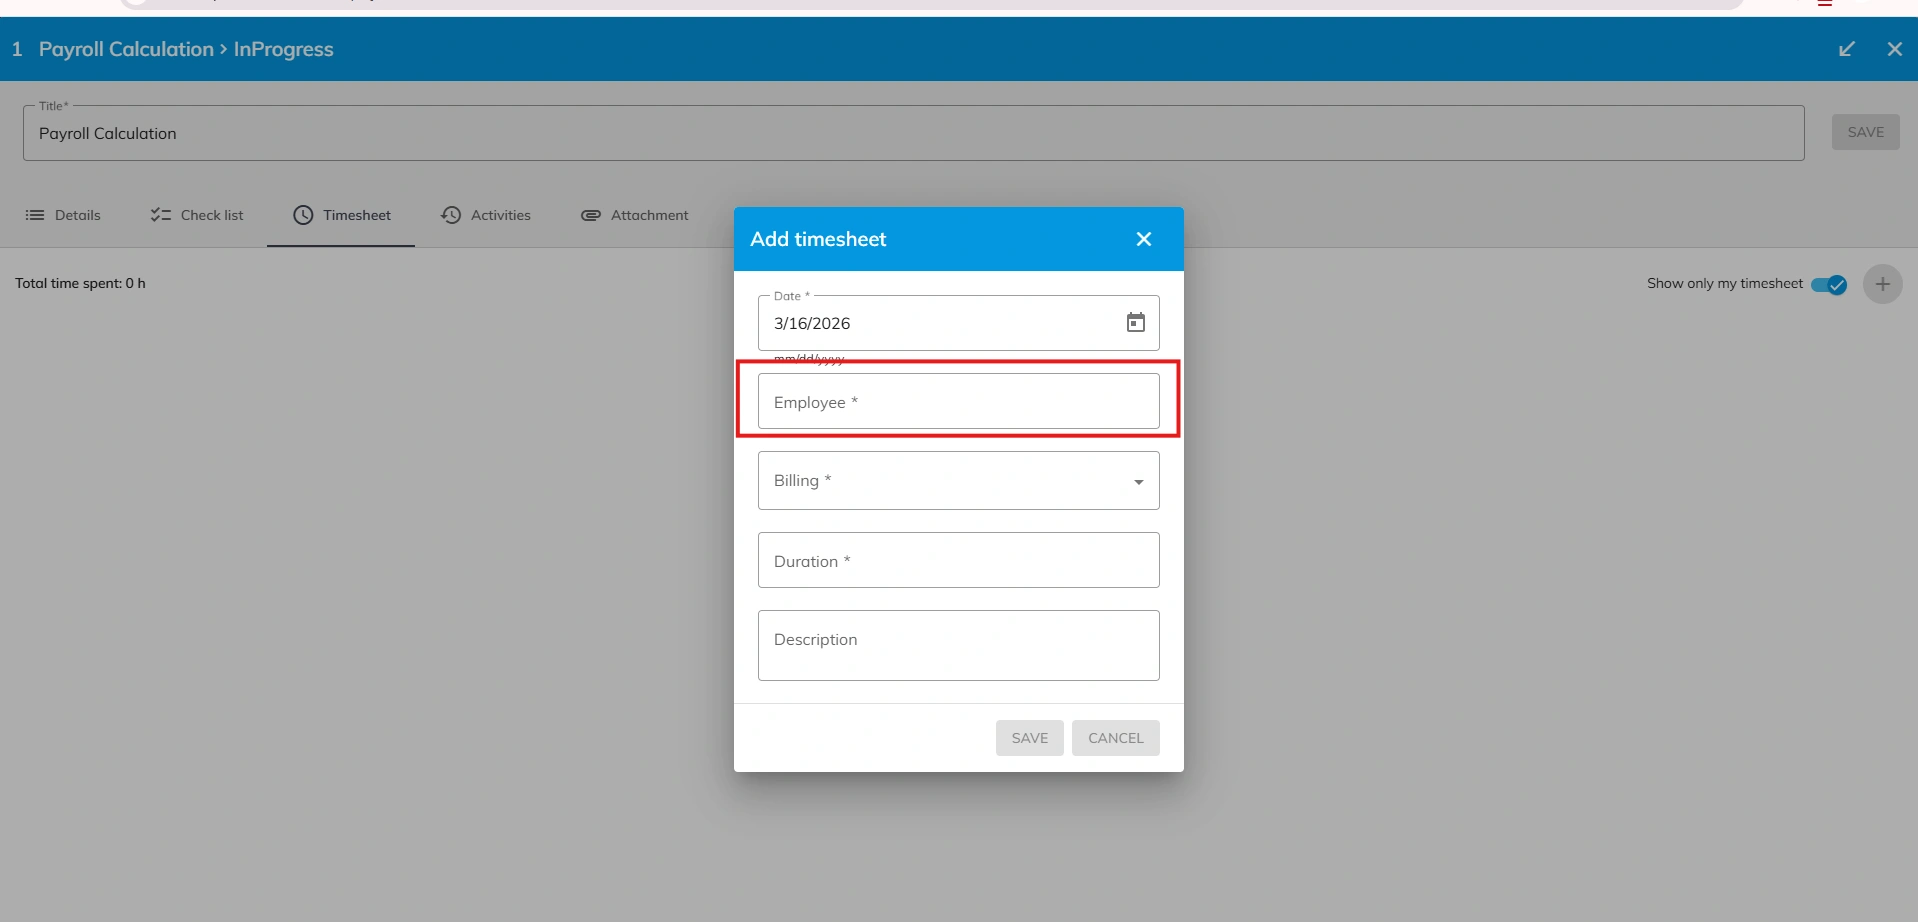
Note: If you are an authorized one to your team’s timesheet, you can also fill other task members timesheet also from within a task. A special employee field will be appear only for youwhile filling the timesheet. From there you can choose the employee name. You can select your name or any other employee name for whom you want to fill timesheet and add Date, Billing type, Duration and Description (optional) for that employee and click to add their timesheet entry. “save”
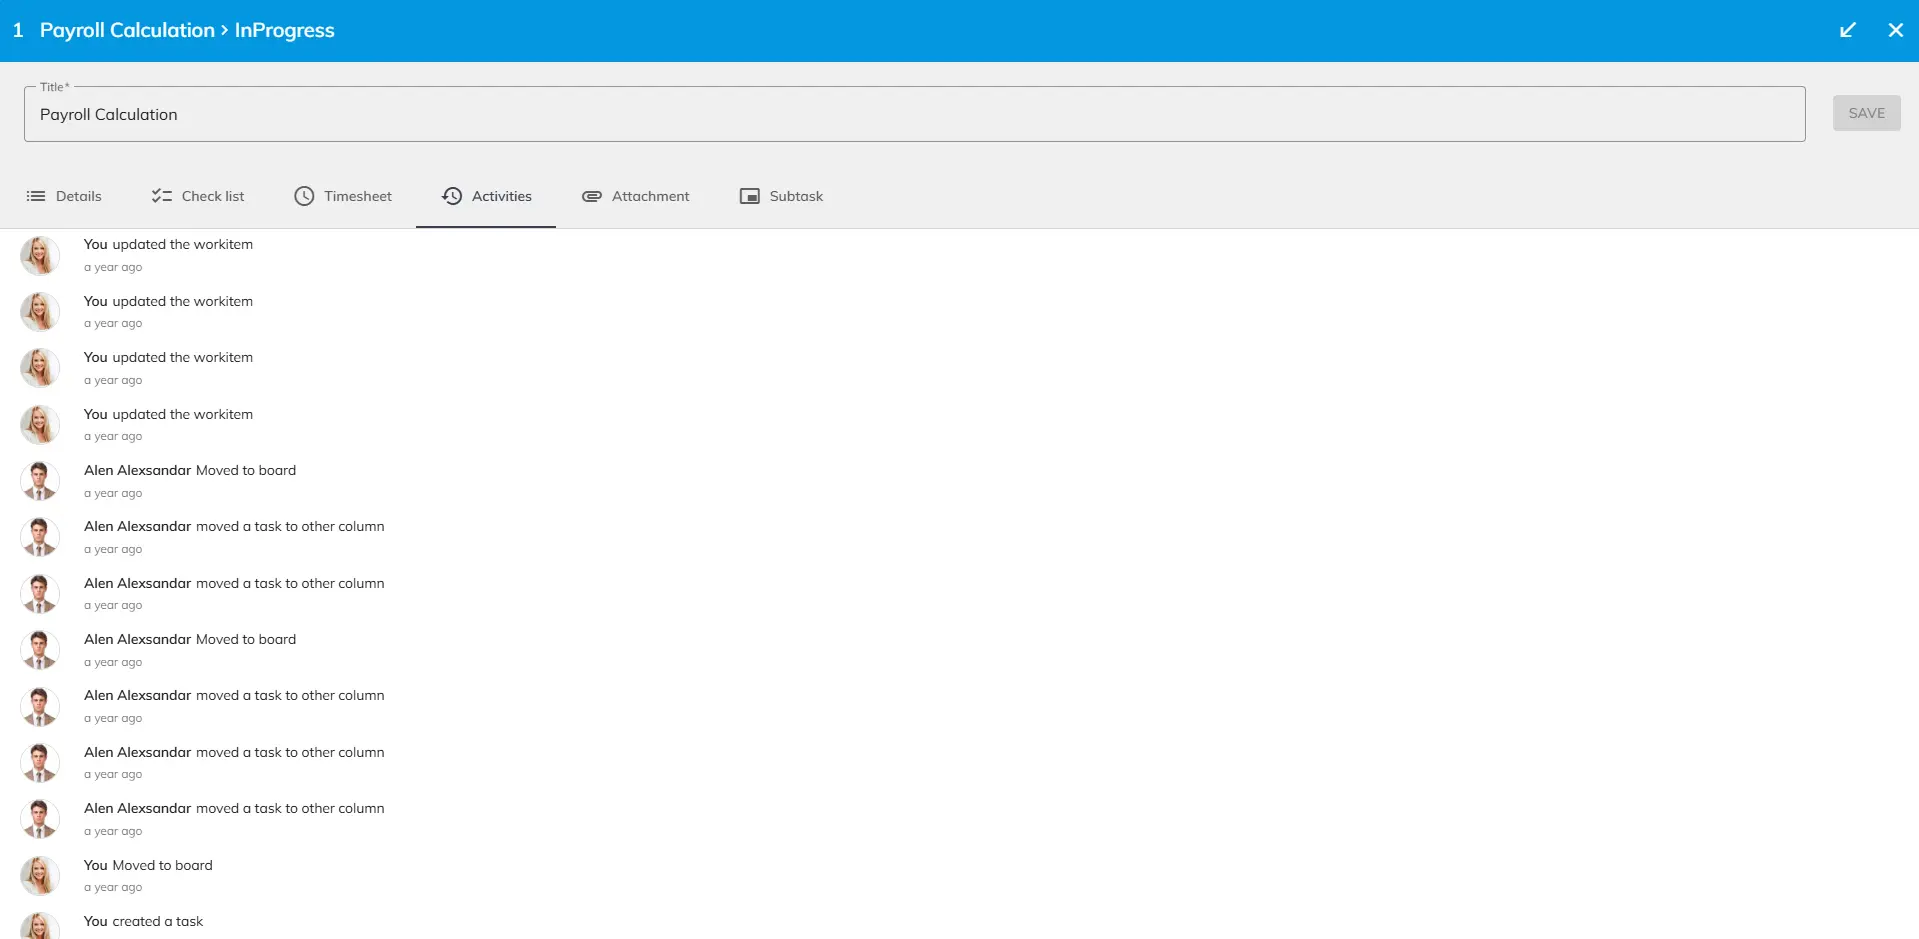
The Activities section inside a task displays all the task activities that are performed by all the task members to all other task performance to ensure clarity while performing tasks.
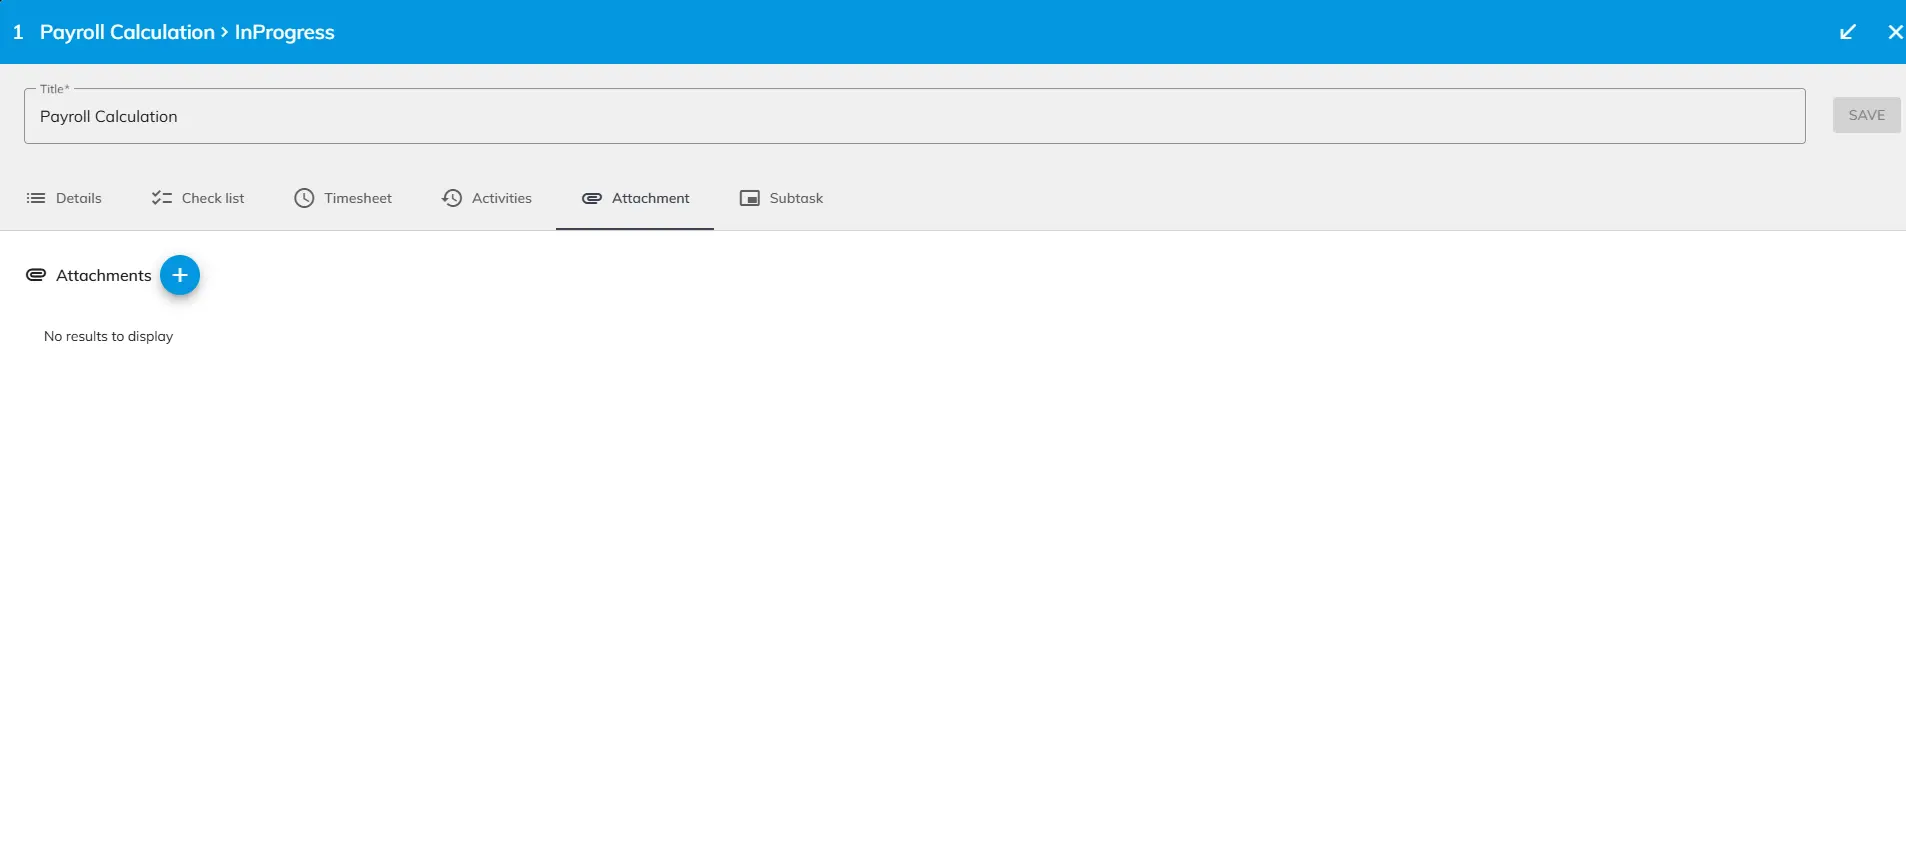
If the members of the tasks want to share files and other documents related to the task, they can use the attachment section.
Step 1: Click the Attachments section and press the plus icon to add any document, image or any other files to the task from your system. Then click the save button to save the task
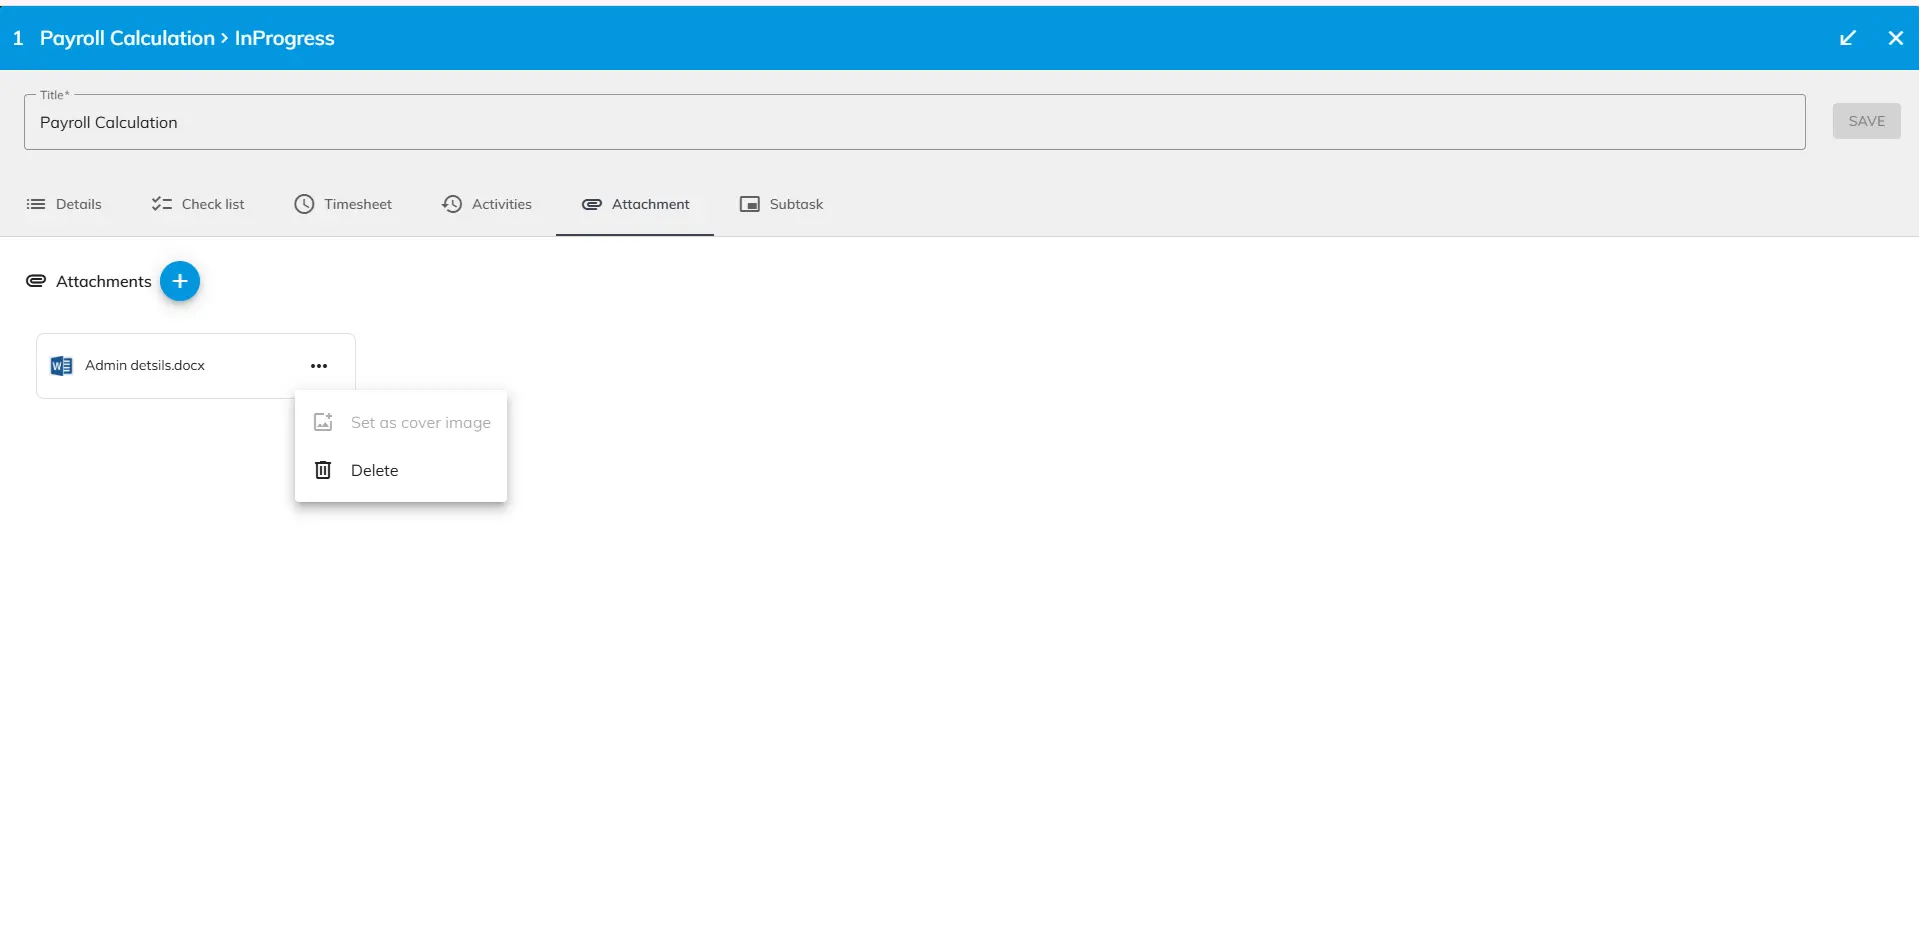
Deleting Attachments:
To delete a attachment, click the three dots and use the delete button to delete it.
Please Note: You cannot add any attachment to the task that in done state.
Note: The attachment uploaded by a task member is visible and accessible to all other task members.
To create a sub-task in OfficePortal, click the sub-task section and press the “Add Link” button. You can either select an existing task or create a new one. If you choose an existing task, you will need to decide whether it will be the parent or the child task. Alternatively, if you choose to create a new task, click the “New Item” button and define its parent-child relationship as per your requirement. The parent task will be highlighted in blue, while the sub-tasks will appear in grey, providing clear differentiation. This setup allows you to organize tasks flexibly and efficiently.
We use third-party services to give you the best user experience and to continuously improve it, however we will not sell your data to any one. These services use cookies. In order to be able to use these services, we need your consent first. I agree and can revoke or change my consent at any time with effect for the future.