OfficePortal is an HRMS with complete Role-based authentication, which is an approach to restrict system access to authorised users. You can use the roles feature to define the hierarchical architecture of your organisation. You can create roles with different system actions, privileges, and field-level permission to access data and perform various operations across the system. You can assign a single role to multiple employees in the organisation.
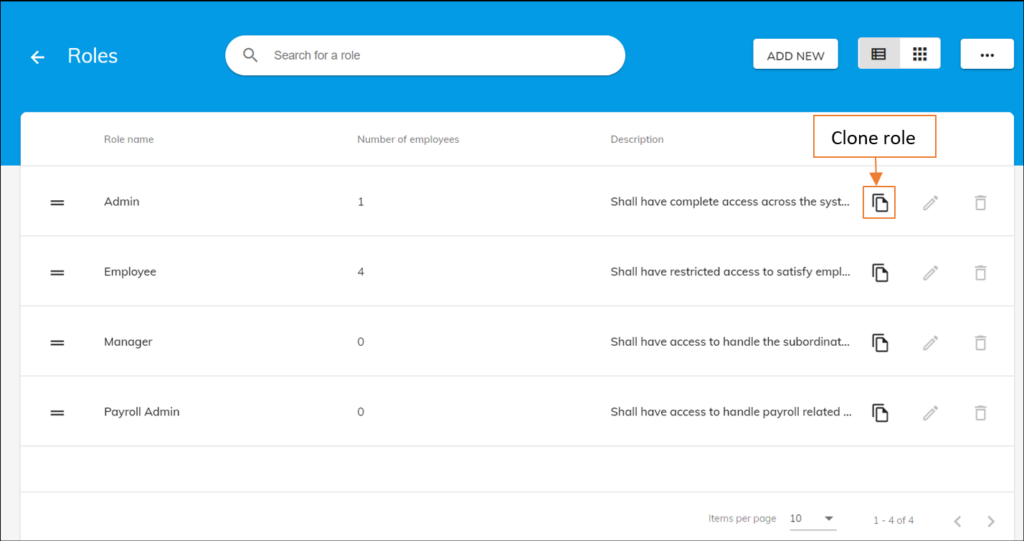
In the Office portal, we have four pre-defined roles such as Admin, Employee, Manager and Payroll Admin.
- The organisation may require a new role in addition to the pre-defined roles. You can do this by creating new roles.
- You can clone a pre-defined role and modify it to meet your requirements if you wish to provide additional access to it.
Admin Role #
Admin is the supreme and the most important role in OfficePortal. Admin is the only role with complete access (i.e., 100 % access) to all the modules and settings across the OfficePortal.
Mostly the Product owner (i.e., head of the organisation) is Admin. You can even assign the “Admin” role to other employees such as HR, Business Unit head, etc.
Employee Role #
The employee will have limited access to the OfficePortal. Based on the permissions provided, they can view and modify their data.
- To mark their attendance (Check-in/Check-out)
- To apply their leaves
- To submit their timesheets
- To view their records/reports
Manager Role #
The manager role is lower in the hierarchy than the “admin” role and superior to the “Employee”. You can assign a “Manager role” to the person who has subordinates because they will have access to view their data & their subordinate’s data. To name a few
- Managers will have access to mark the manual entry for their direct subordinates/reportees.
- They will have access to apply for leave on behalf of their direct subordinates. The Manager can even reset leave accruals and customise leave balance for their direct subordinates/reportees.
- Managers can approve their subordinate’s leave requests and timesheets.
Payroll Admin Role #
Payroll admin will be one of the most important roles in OfficePortal. Other than Admin, the payroll admin role has complete access to all the payroll modules throughout the OfficePortal.
Mostly, the ‘Payroll Admin” role will be given to the person who is the head of the payroll department. You can even assign the ‘Payroll admin” role to other employees who are tax deductors.
How to add a new role? #

- Navigate to the Settings Menu > Account settings > Roles
- Click on Add New
- Enter the apt (or) desirable name for the role you want to create.
- Enter the description of the role
- You can configure permissions for the following modules (as per your OfficePortal subscription).
- Account settings
- Asset
- Asset fields
- Attendance tracker
- Employee
- Employee fields
- Feeds
- Leave tracker
- Monitoring
- Payroll
- Performance management
- Timesheet

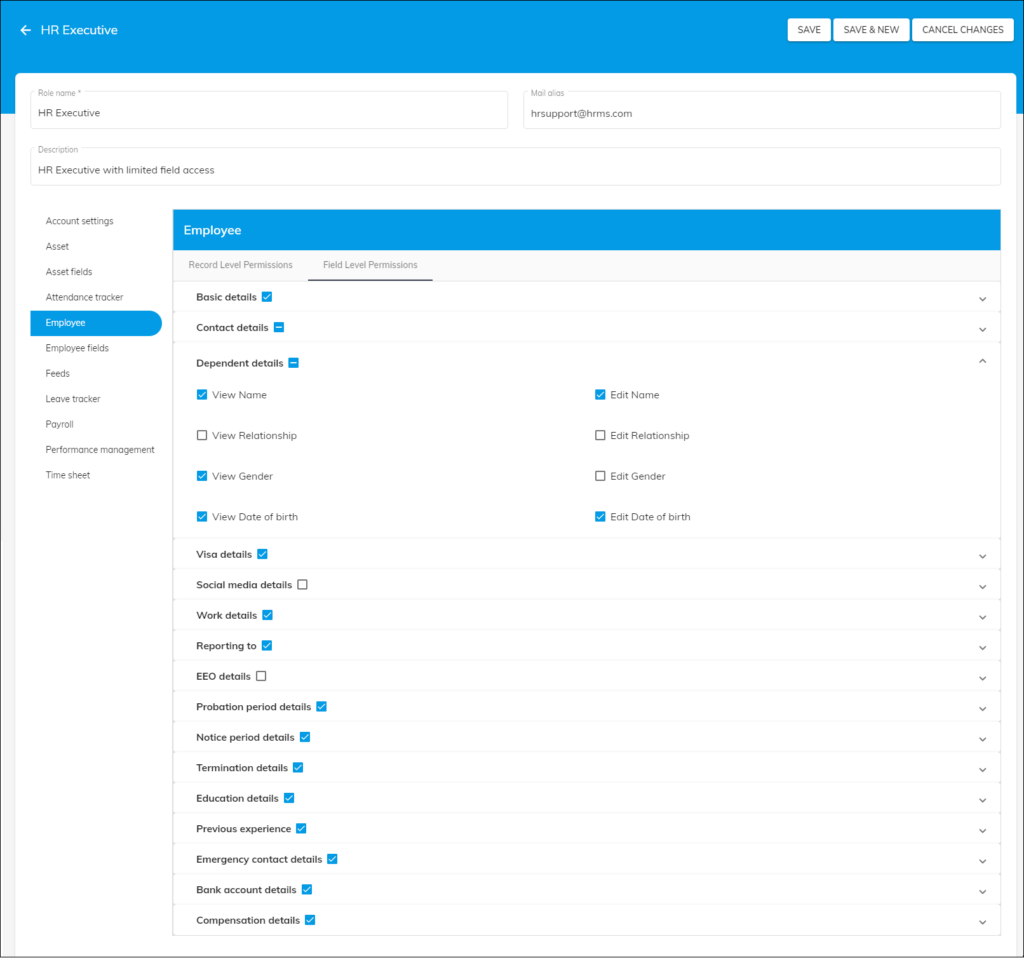
- By default, the employee module will be selected. Only in the employee module, you can configure both record and field-level permissions. The record level permissions will override the field-level permissions. The field-level permissions available in the OfficePortal are listed below
- Only view permission – Selecting only “View” permission will allow you to view only the particular field.
- View and edit permission – Selecting “View” & “edit” permission will allow you to view & edit the particular field.
- No view (or) edit permission – If you don’t want to display any particular field, you should not provide view or edit permission.
- Just tap on any module for which you want to configure permissions.
- If you want to provide all access to any sub-modules, you can click on the “Select all” checkbox.
- Suppose you want to provide any particular access ( Add/ Edit/ Delete/ View/ Search). In that case, you can click on the checkbox provided near each system action, and you must select its privileges if it is available.
- The privileges available in the OfficePortal are listed below
- Own data
- “Own data” privilege will allow you to access only your data. You can give the “Own data” privilege to the person for whom you wish to restrict access to any of the other people’s data in the organisation.
- Own and direct reportees data
- “Own and direct reportees data” privilege will allow you to access your’s and your direct subordinate’s data. You can give managers the “Own and direct reportees data” privilege.
- Own, direct and indirect reportees data
- “Own, direct and indirect reportees data” privilege will allow you to access your data and your direct & indirect subordinate’s data. You can give the “Own, direct and indirect reportees data” privilege to the business unit heads.
- Everyone’s data
- As the name implies, the “Everyone’s data” privilege will allow you to access everyone’s data. You can give the ” Everyone’s data” privilege to the higher authorities such as Product owners, CEO, etc.
- Once you have configured the permissions, you can click on the “Save” button to Save the role or Click on “Save & New” to save & add another role in the “OfficePortal”.
- Note: You cannot deselect the system actions marked in grey, which are required to access the OfficePortal.
Clone Role #
You can use the clone role option to create a new role similar to but not identical to an existing role, which means the cloned role will have the same set of access permissions as the original role. The cloning role is a quick, streamlined approach that avoids the time consuming to select permissions for new roles.
If you want to make only a few changes to an existing role, then you can clone an existing role and modify it as per your requirements.
How to clone a role? #
- Navigate to the Settings Menu > Account settings > Roles
- You can click on the “Clone role” button of the role you’d like to clone in the roles list.
- We will create a new role with the same set of access permissions.
- Now, you can click on the “edit” button of the role.
- You can modify the role name, description, and it’s permissions
- Finally, you can click on the “Save” button to save the changes.


